Two ways to see your crew.
Crew has two top-level views, and you flip between them anytime with the toggle at the bottom of the sidebar (or ⌘K → “Switch view”).
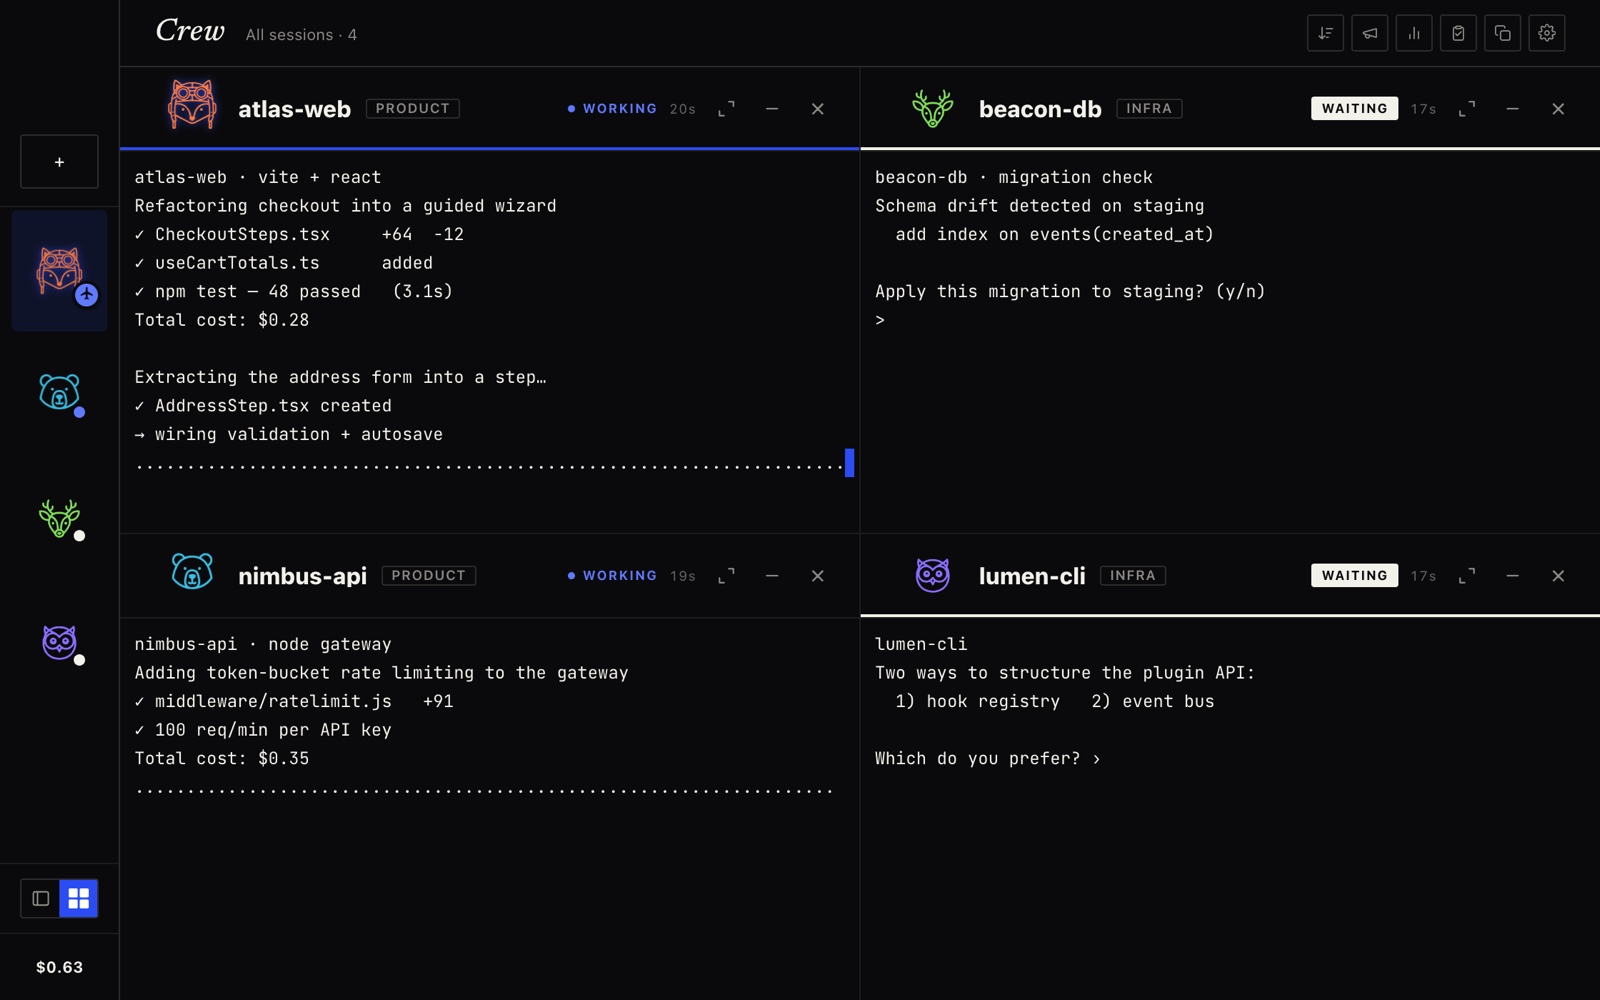
Grid view — mission control
Every session becomes a live tile with its own scrolling terminal, so you can watch the whole crew at a glance. Tiles auto-scroll to the latest output — right where an agent is asking for input.
Focus view — one session, full attention
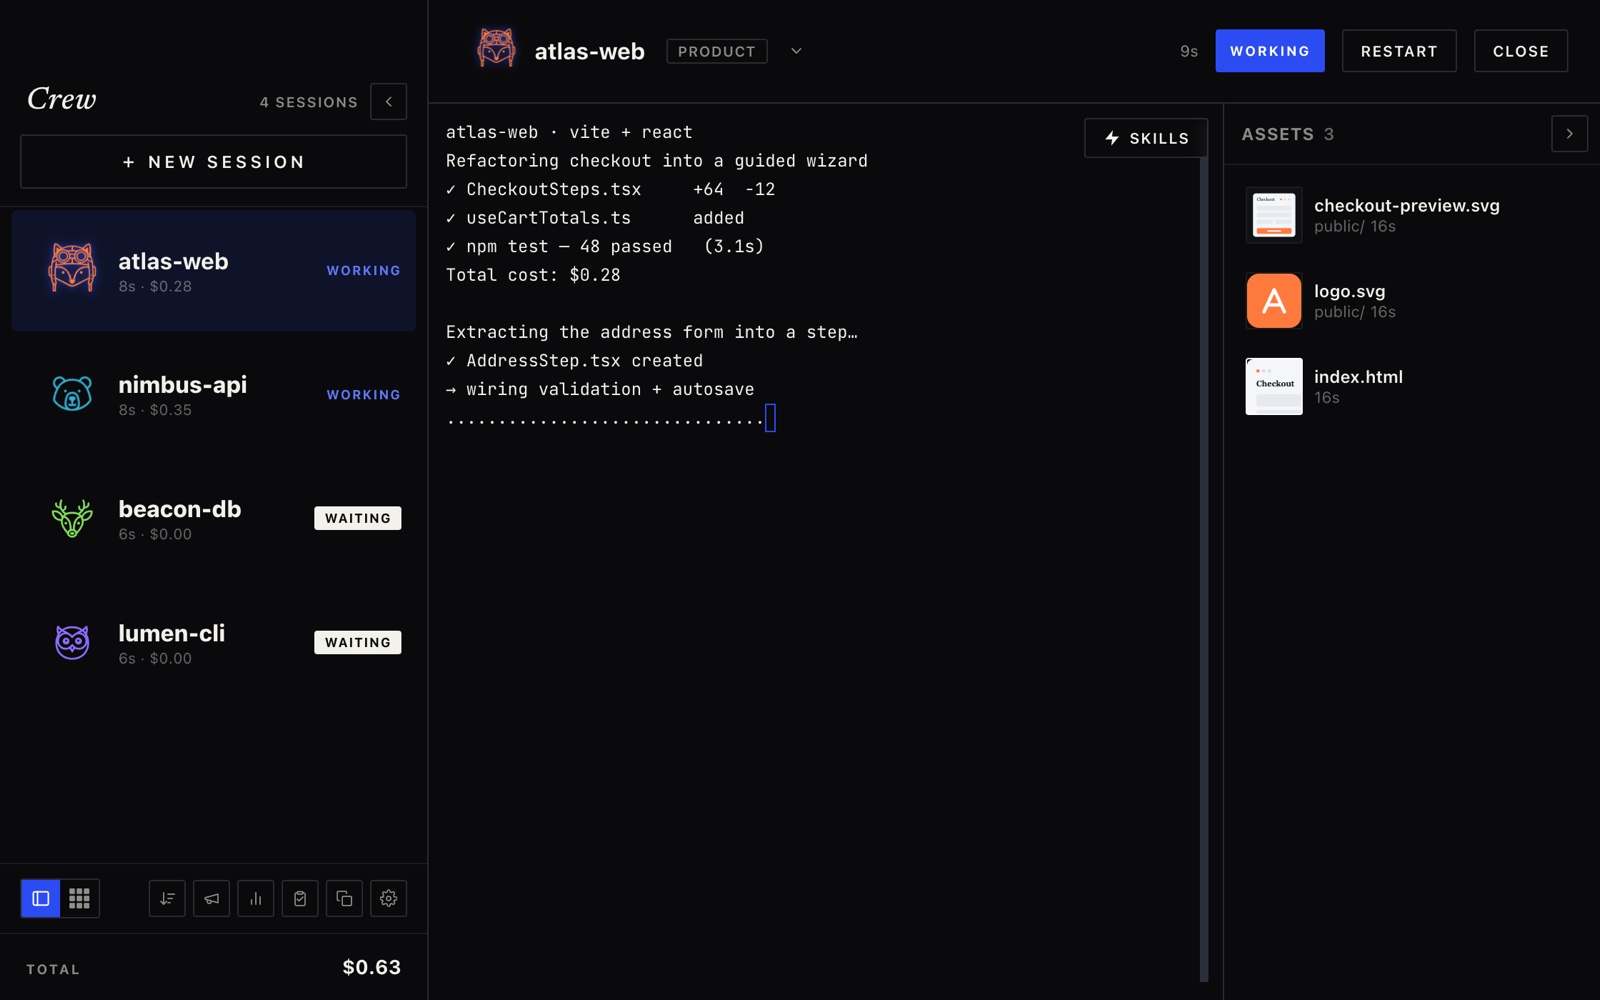
Focus view gives a single session the whole canvas: its full terminal in the middle, the Skills chip and Assets pane on the right, and the roster on the left. Click any session (or press ⌘1–⌘9) to focus it.
The sidebar.
The left sidebar — the roster — is your list of every session. Each row is a card showing the session’s character, name, how long it’s been in its current state, spend, and a live status.
- + New Session launches an agent (see creating a session).
- Each card shows the animated character, the label, time-in-state, optional spend, and a status tag. Drag cards to reorder them.
- Hover a card for its minimize (hide behind “Show more”) and close controls; exited sessions show a restart ↻.
- The Crew wordmark at the top replays the launch intro; the count shows how many sessions you’re running.
- The footer totals your spend (and credits) across all sessions — it turns to a warning once you pass your budget.
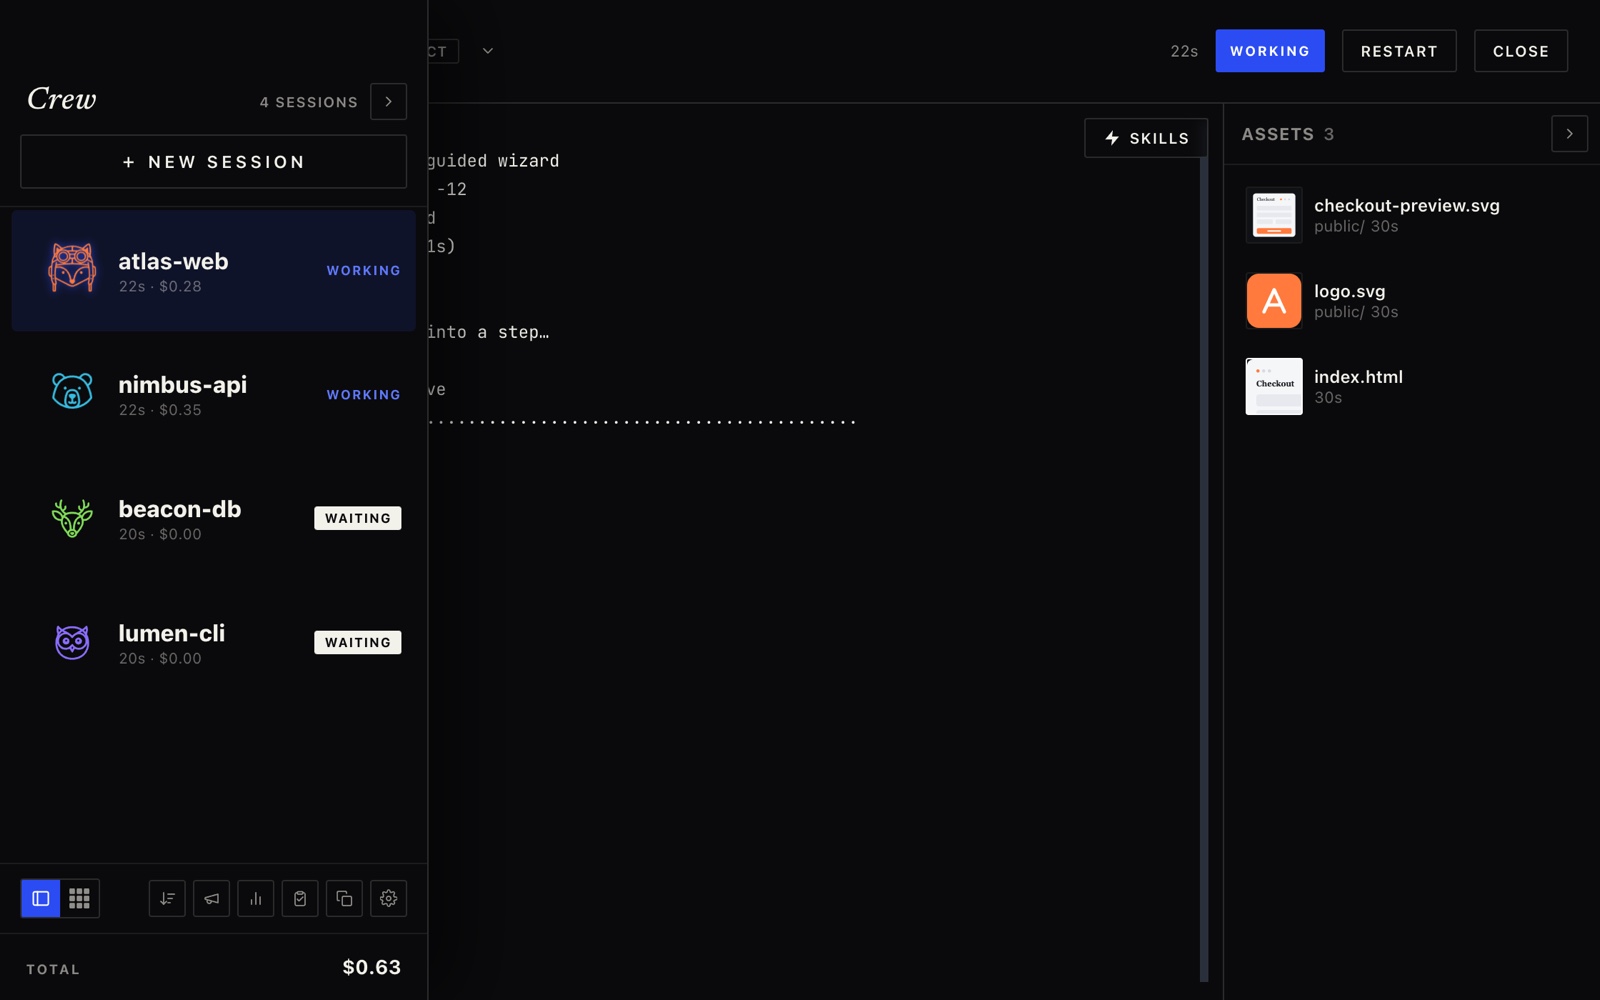
- Drag the sidebar’s right edge to resize it; the ‹ button collapses it to a rail.

The sidebar toolbar.
A tidy row of controls sits at the very bottom of the sidebar. Left to right:

- Focus view — one session, full width.
- Grid view — the live dashboard; click again to change density.
- Sort / group — how the roster is organized (see modes).
- Broadcast — send one prompt to many sessions.
- Activity & spend — opens the Project Tracker on its Activity tab.
- Project Tracker — the full-screen project dashboard, Planning tab (see it).
- New window — a second Crew window (⇧⌘N).
- Settings — notifications, spend, transcripts and more.
The session title bar.
In focus view, the header above the terminal is the session’s control strip.

- Character — click to change the icon & color (how).
- Label — click to rename the session inline.
- + Group — tag the session into a group.
- Details — expands the working directory, agent & PID.
- Time-in-state — how long it’s been working / waiting.
- Status — the live state chip.
- Restart — relaunch the agent in place.
- Close — end the session.
Grid tiles.
Each tile in grid view has a compact header over its live terminal. The header is also a drag handle — rearrange tiles by dragging them.

- Character — click to restyle; drag the header to move the tile.
- Label — the session name.
- Group tag — its group chip (click to edit).
- Status & time — working / waiting, and for how long.
- Open in focus — expand this session to the full view.
- Minimize — tuck it behind “Show more”.
- Close — end the session.
A session that needs you glows so it’s obvious even in a crowded grid.
Working vs. waiting.
Because Crew owns each agent’s terminal (its PTY), it sees the full output stream and knows exactly when it last sent input. That lets it tell a busy agent apart from one that’s blocked on you — and surface the difference everywhere.
- Working — output is flowing; the character animates and the chip is cobalt.
- Waiting for you — output went quiet at a prompt; the chip inverts to bright ivory, the loudest state in the app.
- Needs approval — a yes/no gate; answer it from the approval bar.
- Idle / Exited / Error — muted or restrained, so they never compete for attention.
Detection uses output quiescence plus prompt signatures, with a debounce so brief pauses between token bursts don’t flip the dot, and a grace window after you type so echo isn’t mistaken for “done”. A white dot and a menu-bar badge appear when someone needs you; ⌘J jumps straight to the next waiting session.
Characters & colors.
Every session gets its own animal character and color so you can recognize it at a glance — no reading labels. Click the character (in the title bar or on any tile) to open the picker.
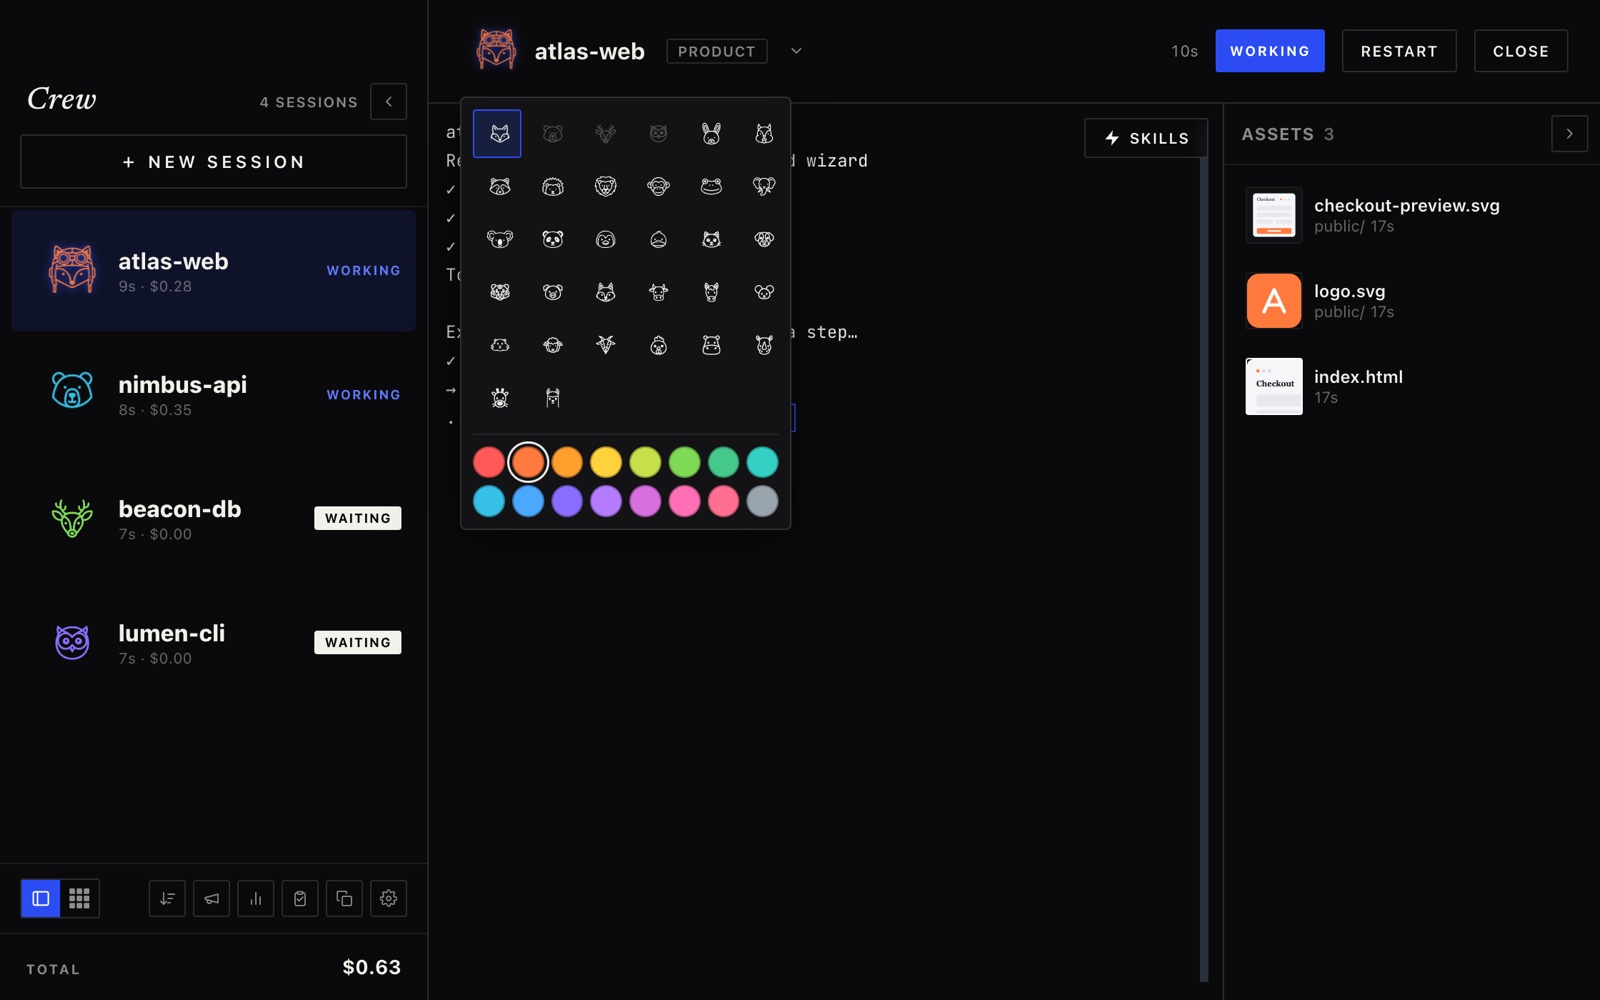
The palette is sixteen hand-tuned hues, bright enough to read against the near-black UI:
New sessions get a random color; change it anytime — it’s remembered per session.
Creating a session.
Hit + New Session (or ⌘N) to launch an agent. Crew detects the agents you have installed (Claude Code, Copilot CLI…) so you can pick one from a list.
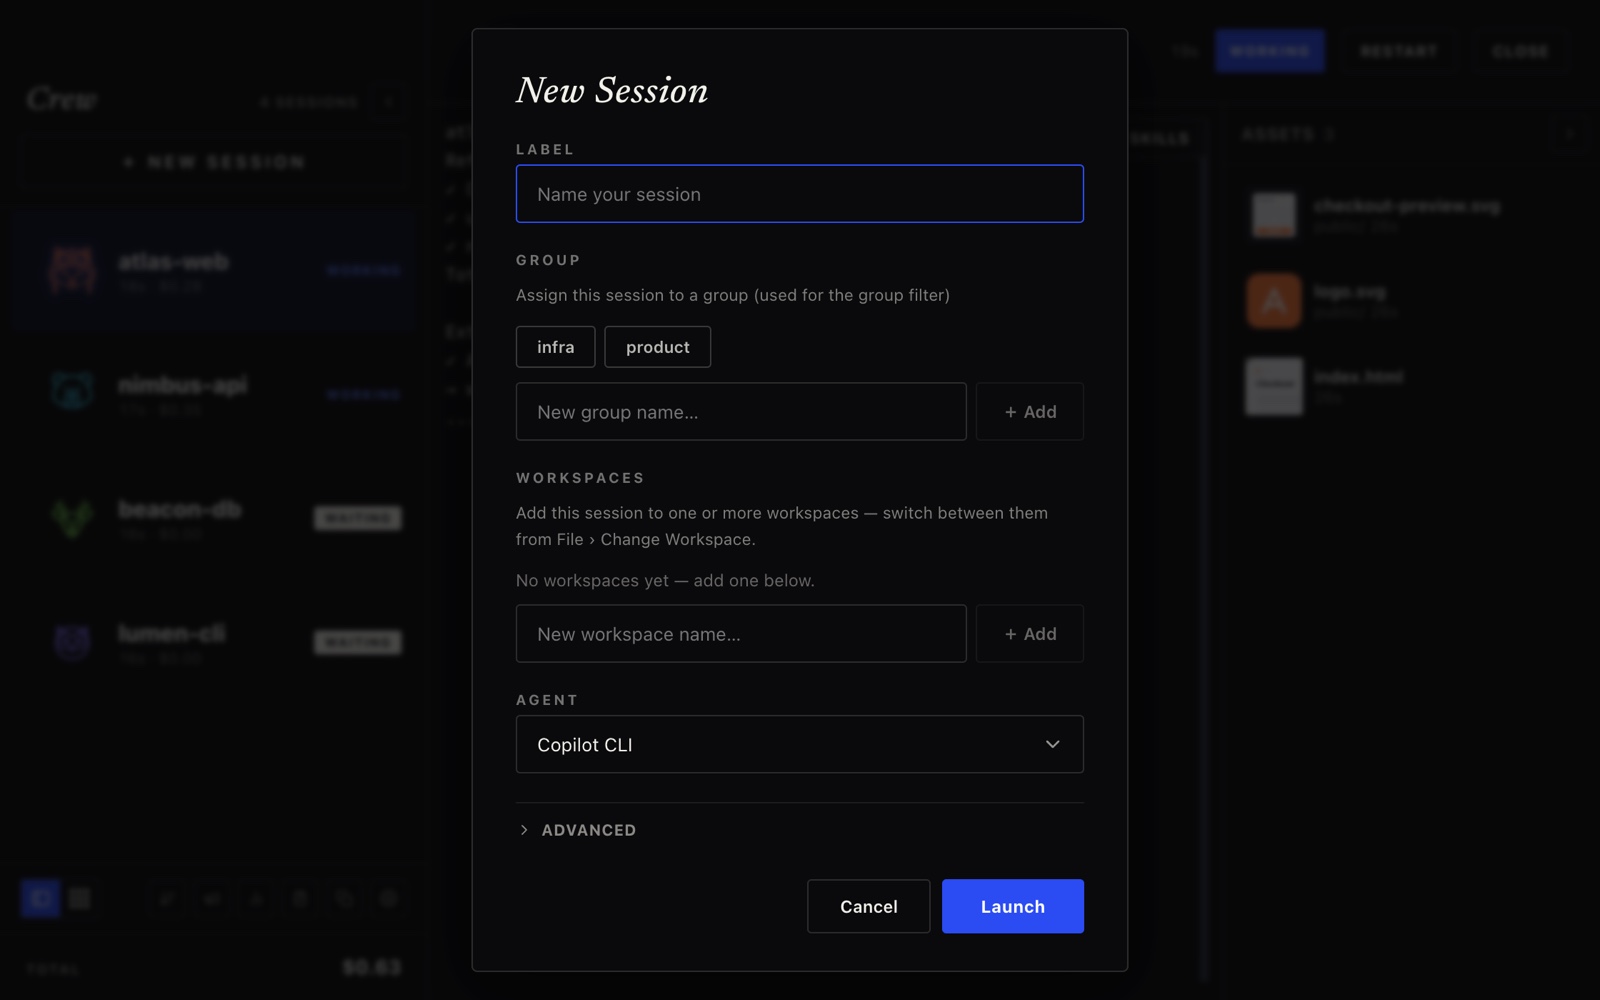
- Label — an optional name (auto-derived from the folder + agent if blank).
- Group — assign a single group tag, used by the “By group” sort.
- Workspaces — add it to one or more workspaces to filter by later.
- Agent — Claude Code, Copilot CLI, a plain Shell, or Custom command… with your own command + arguments.
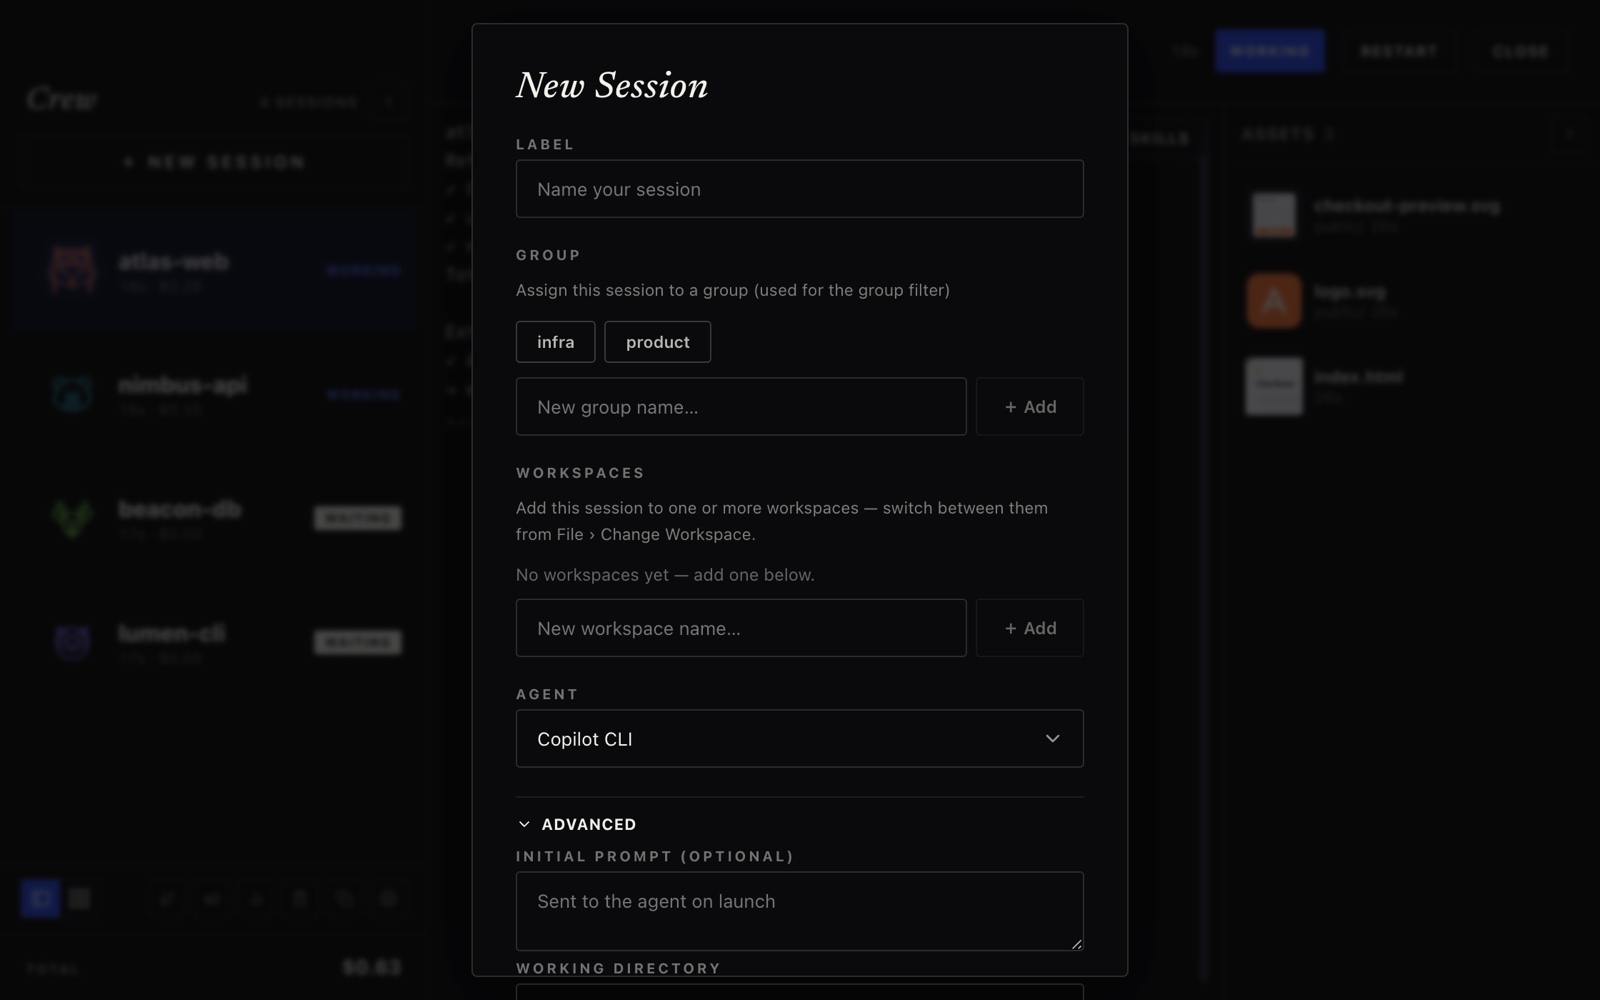
Open Advanced for an initial prompt sent on launch, a custom working directory, and saved sets — snapshot the currently open sessions under a name and relaunch them all in one click later.
Groups vs. workspaces.
Two ways to organize sessions — they sound similar but do different jobs.
One label per session
A single tag like frontend or infra. Groups cluster sessions under headers when you sort “By group” — but a session belongs to exactly one.
Filter across many
A session can belong to several workspaces (e.g. “July” and “Client X”). Switching the active workspace filters what you see — hidden sessions keep running.
Switch the active workspace from the command palette (⌘K → “Workspace: …”) or File › Change Workspace. When a filter is on, the sidebar shows the active workspace with a one-click way to clear it.
Sorting & grouping.
The sort button (in the sidebar toolbar and the grid top bar) groups your sessions four ways.
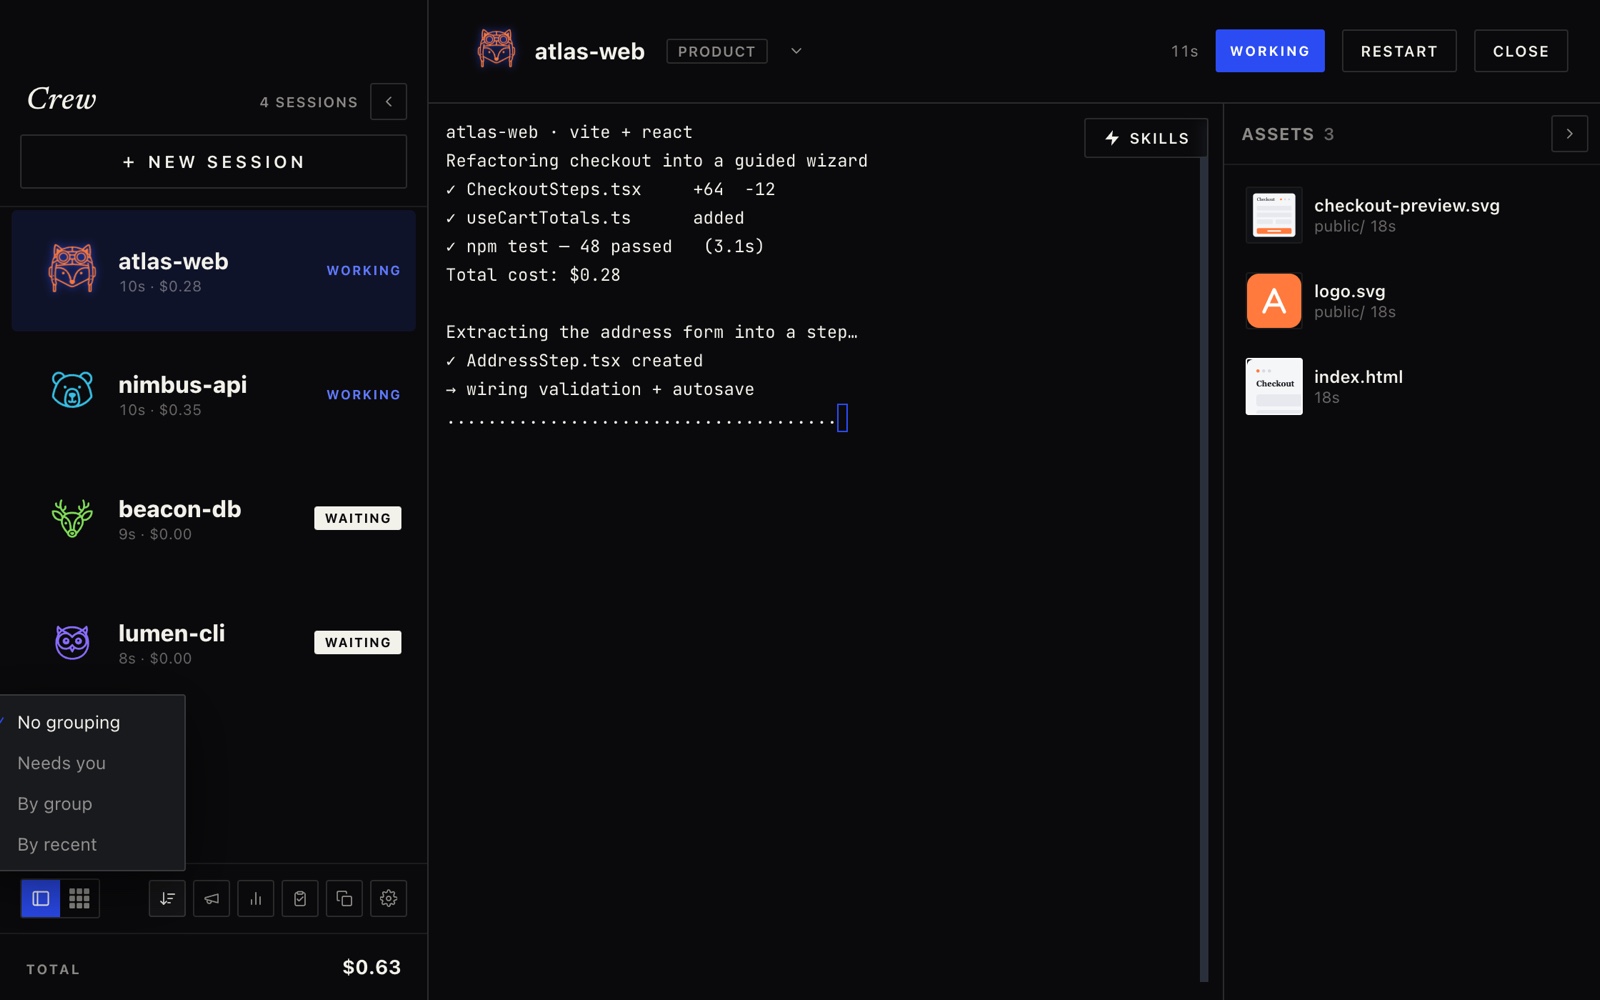
- No grouping — one flat, drag-to-reorder list.
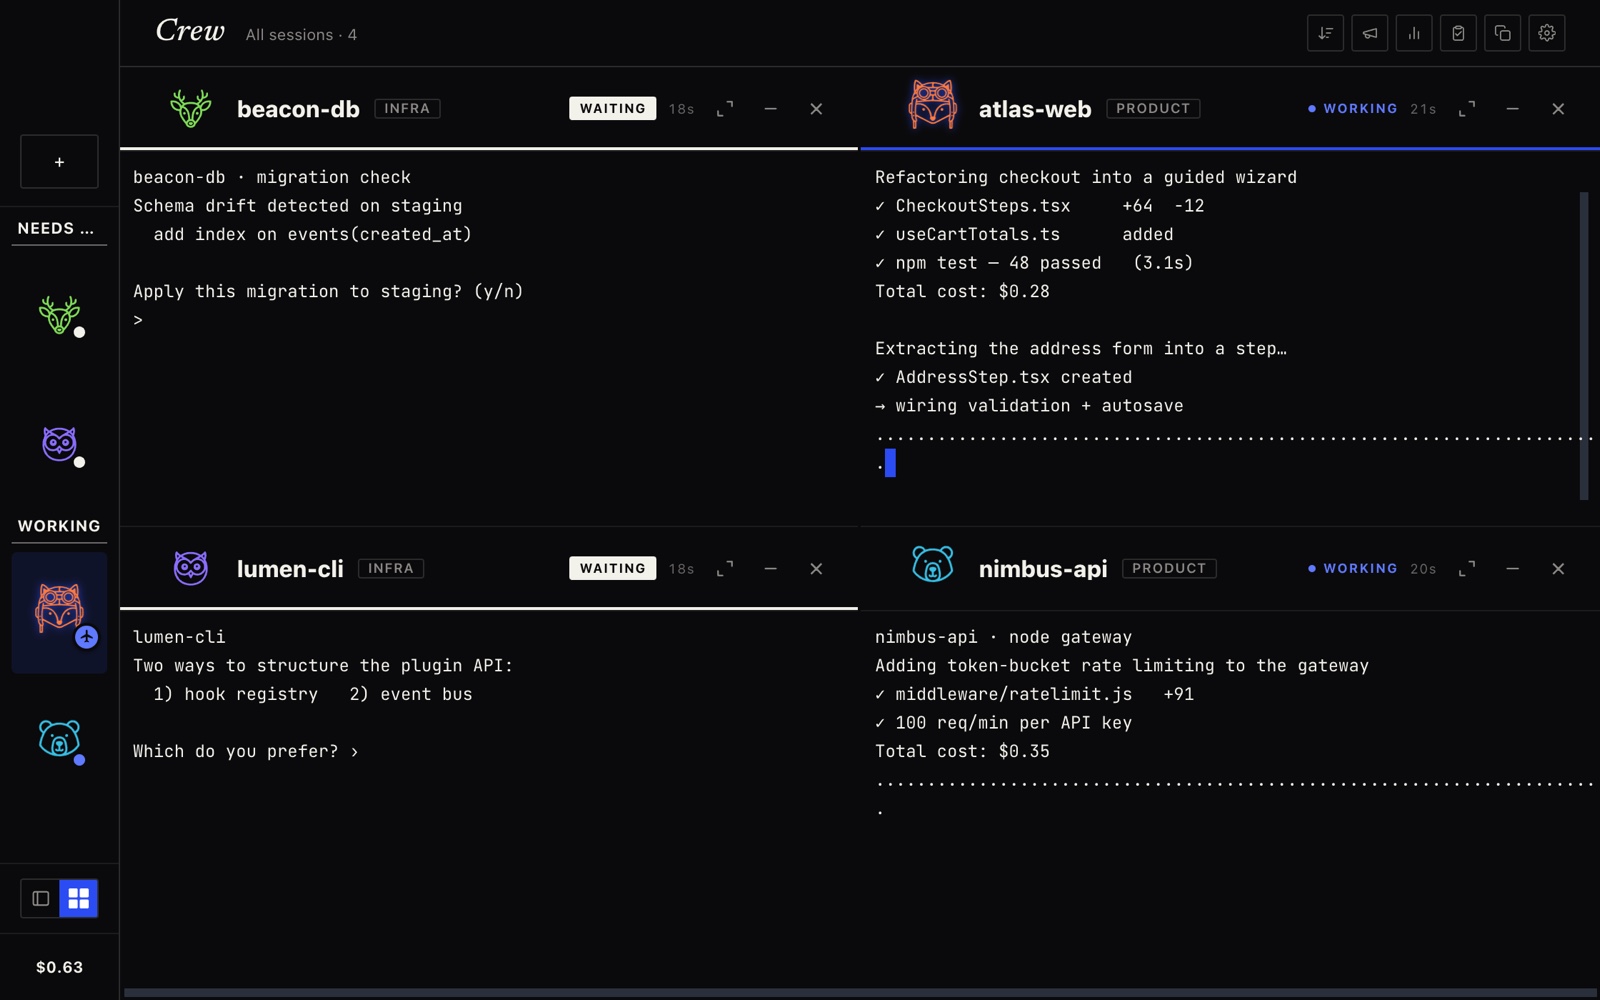
- Needs you — splits into “Needs you” and “Working” so blocked agents rise to the top.
- By group — clusters by each session’s group tag (drag a session onto a header to move it).
- By recent — buckets by how recently you prompted it (Last 30 min / 2 hrs / day / week+).
Grouping applies in the grid too — each group becomes its own band:
The assets pane.
The panel on the right of focus view watches the session’s working directory and previews what your agent creates — images, HTML pages, PDFs, video and audio — right inside Crew.
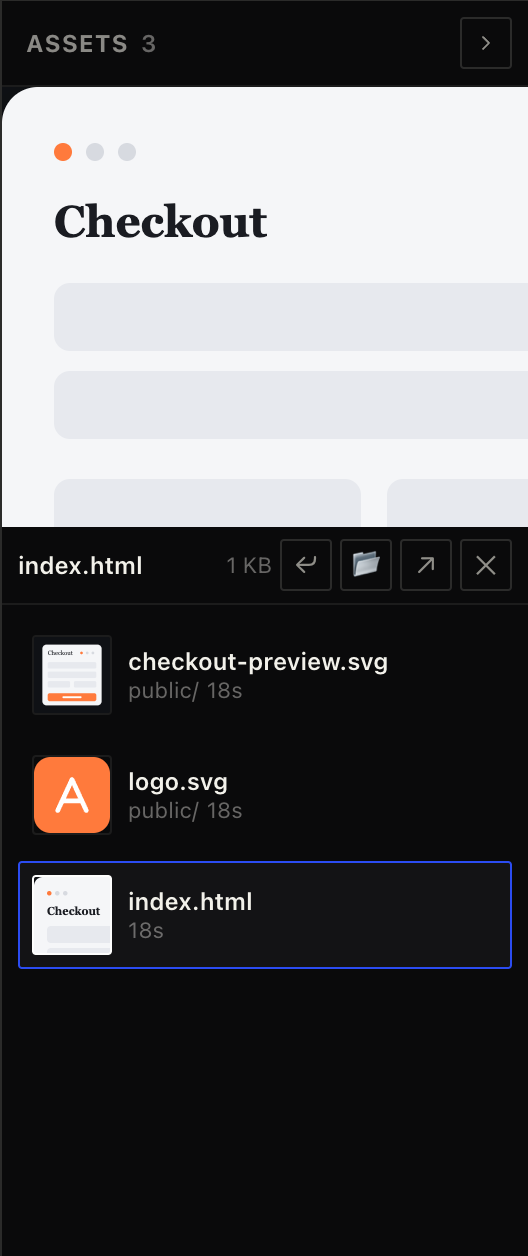
- Preview inline — click a page/PDF/video to preview it; click an image to open it in your OS previewer.
- Insert path (⤶) — drops the file’s path into the terminal, ready to reference in your next prompt.
- Reveal in Finder (📂) and Open with default app (↗).
- Clicking a file path in the terminal previews it here automatically.
- Collapse the whole pane to a slim rail when you want more terminal.
Skills.
The ⚡ Skills chip above the terminal opens a gallery of reusable actions, grouped into categories. Crew reads the skills your agent actually has installed (Copilot / Claude), and you can pin favorites or add your own.
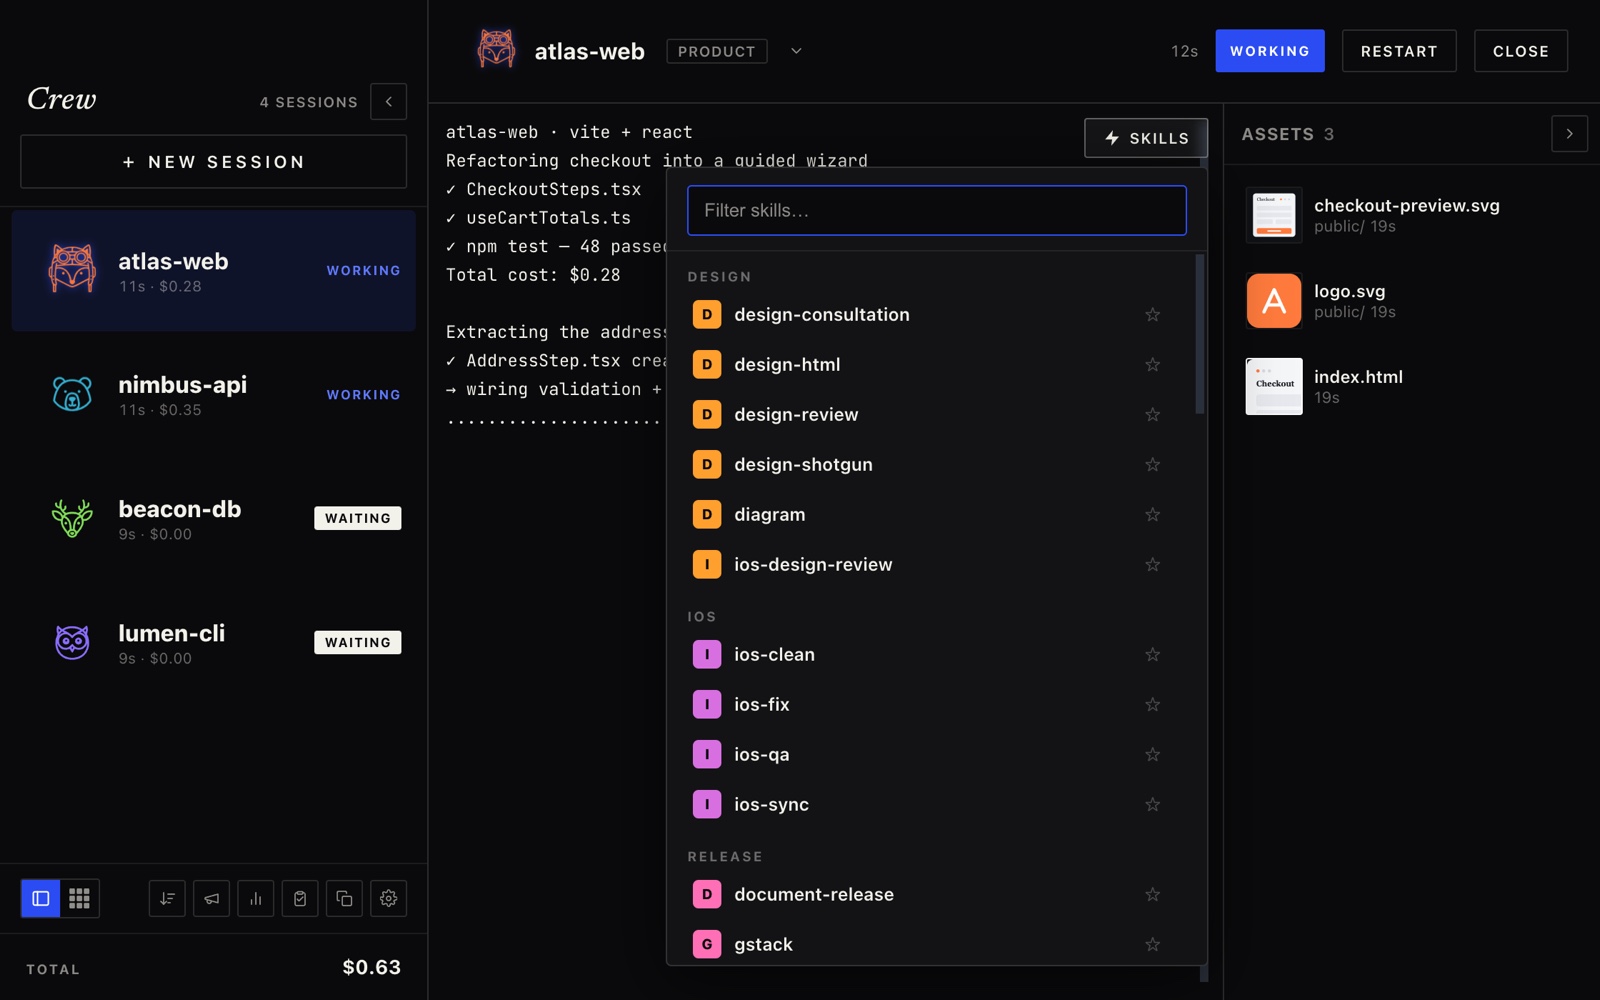
- Filter to find a skill fast; favorites pin to the front.
- Each skill carries a small heat dot — hotter means more widely used across your installed set — so popular skills are easy to spot.
- Click a skill to read its description; click again (or Invoke) to type
use <skill> to …into the session for you. - + Add your own custom skills (name, invoke token, description) — stored locally.
- When the session’s folder is a GitHub repo, a GitHub chip appears beside Skills — click it to open the repository in your browser and copy its URL to your clipboard. In Settings you can hide the chip, or switch it to copy-only (no browser).
The Enhanced Terminal.
Flip on Beta: Enhanced Terminal Interface in Settings and every session renders with Crew’s own GPU-accelerated terminal engine — the same stream, but now it understands the shape of your session.
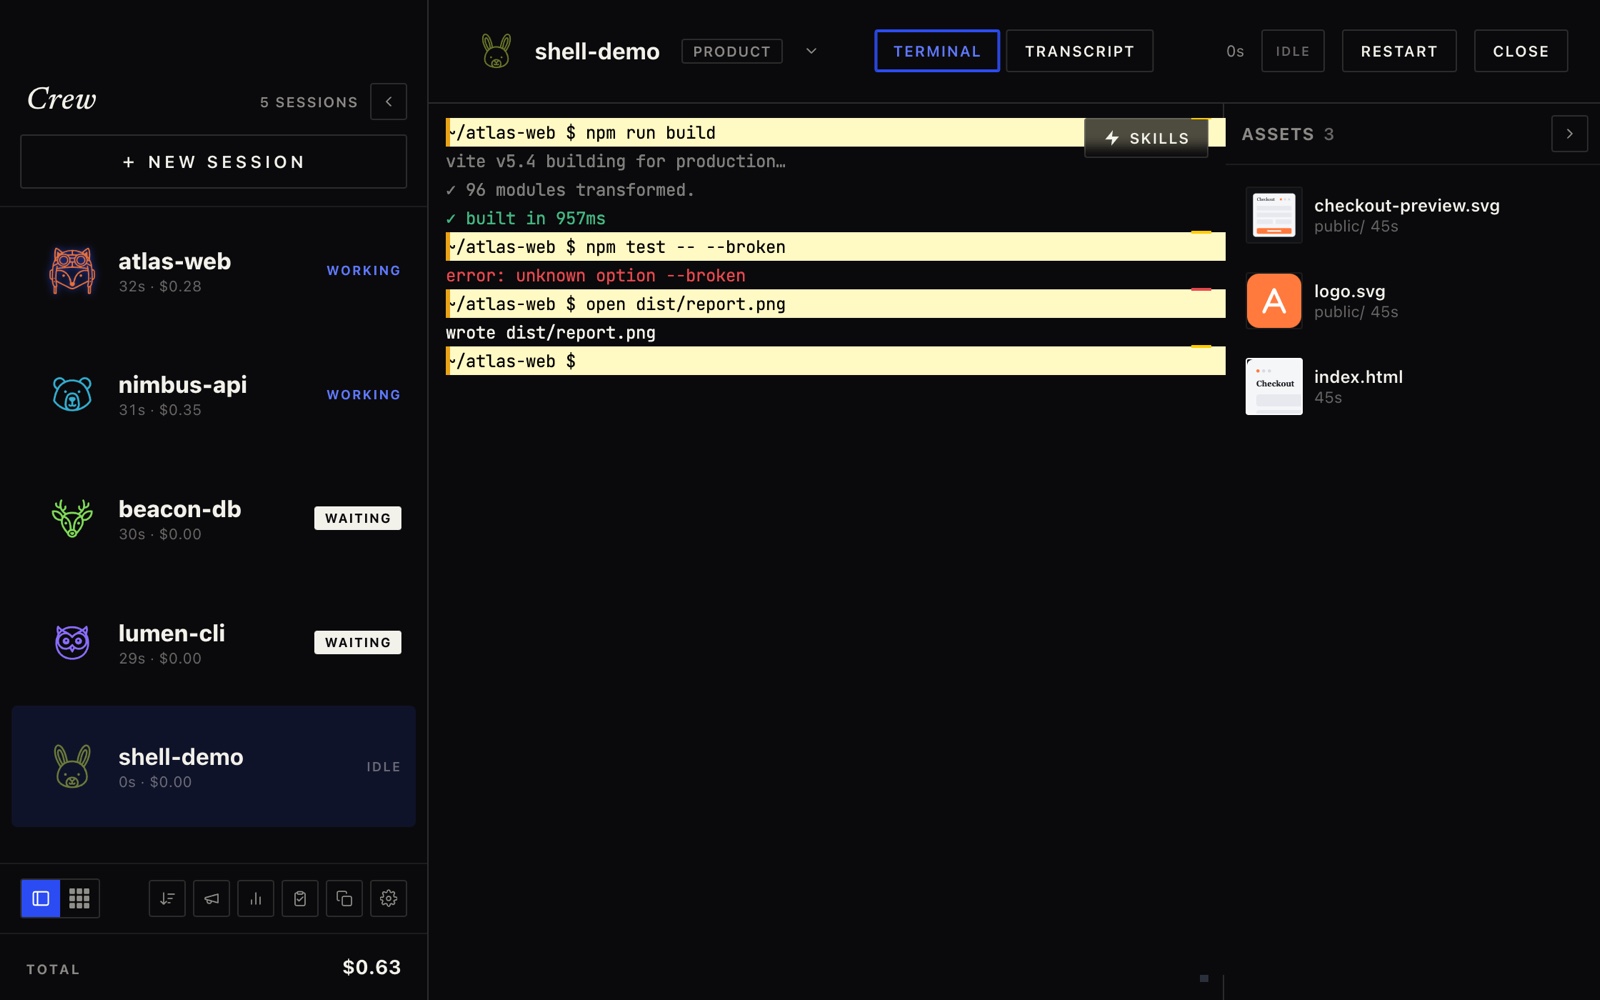
- Your input rows are highlighted — every command you run gets a light row + amber bar, so the conversation is easy to scan.
- Overview ruler (right edge) — a map of the whole session: your prompts, plus green / red ticks for each command’s exit code.
- Jump between prompts with ⌘↑ / ⌘↓ (Ctrl on Windows).
- Clickable paths & links — underlined, and open in Assets or your browser.
- Inline images (Sixel / iTerm2) so agents can render plots and diffs right in the stream, and opt-in shell integration (OSC 133) sharpens the command marks.
The Transcript view.
With the enhanced terminal on, each session gains a Terminal / Transcript toggle — in the focus-view header and on every grid tile. The Transcript is a typed read-layer over the raw stream: your prompts, the agent’s replies and reasoning, the commands it ran (with exit codes), and — crucially — the moments it’s blocked on you, all as clean blocks.
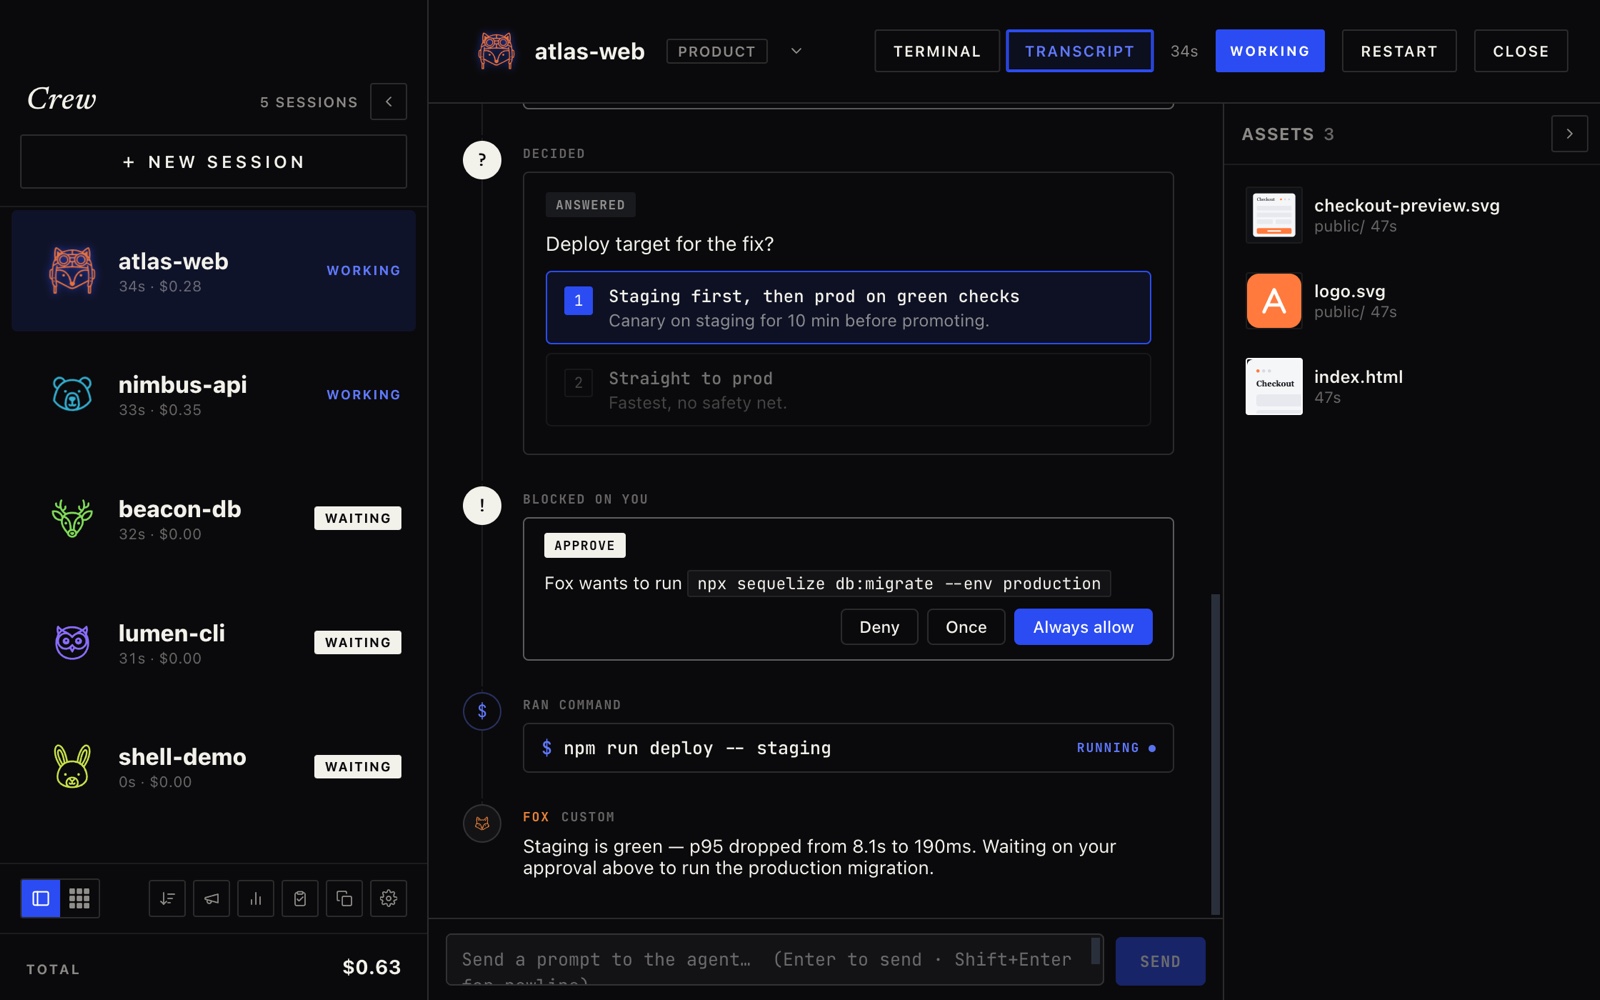
- Decisions — numbered choices you can click (or press the number) to answer.
- Approvals — “Fox wants to run …” with Deny / Once / Always allow, wired back to the session.
- Ran commands — each with its status and exit code; the raw terminal stays the source of truth.
- Thinking blocks — the agent’s reasoning as a compact “Thought for Ns” card you can expand.
- Prompt composer — a text box at the bottom to message the agent without leaving the transcript (Enter to send, Shift+Enter for a newline).
The App pane.
When a session is building a web app, a third tab — App — joins Terminal and Transcript in the header. Start your dev server in the terminal as you normally would; the moment Crew spots its local URL (Vite, Next, Create React App, and friends) in the session’s output, the tab lights up and renders your running app live, right inside Crew.
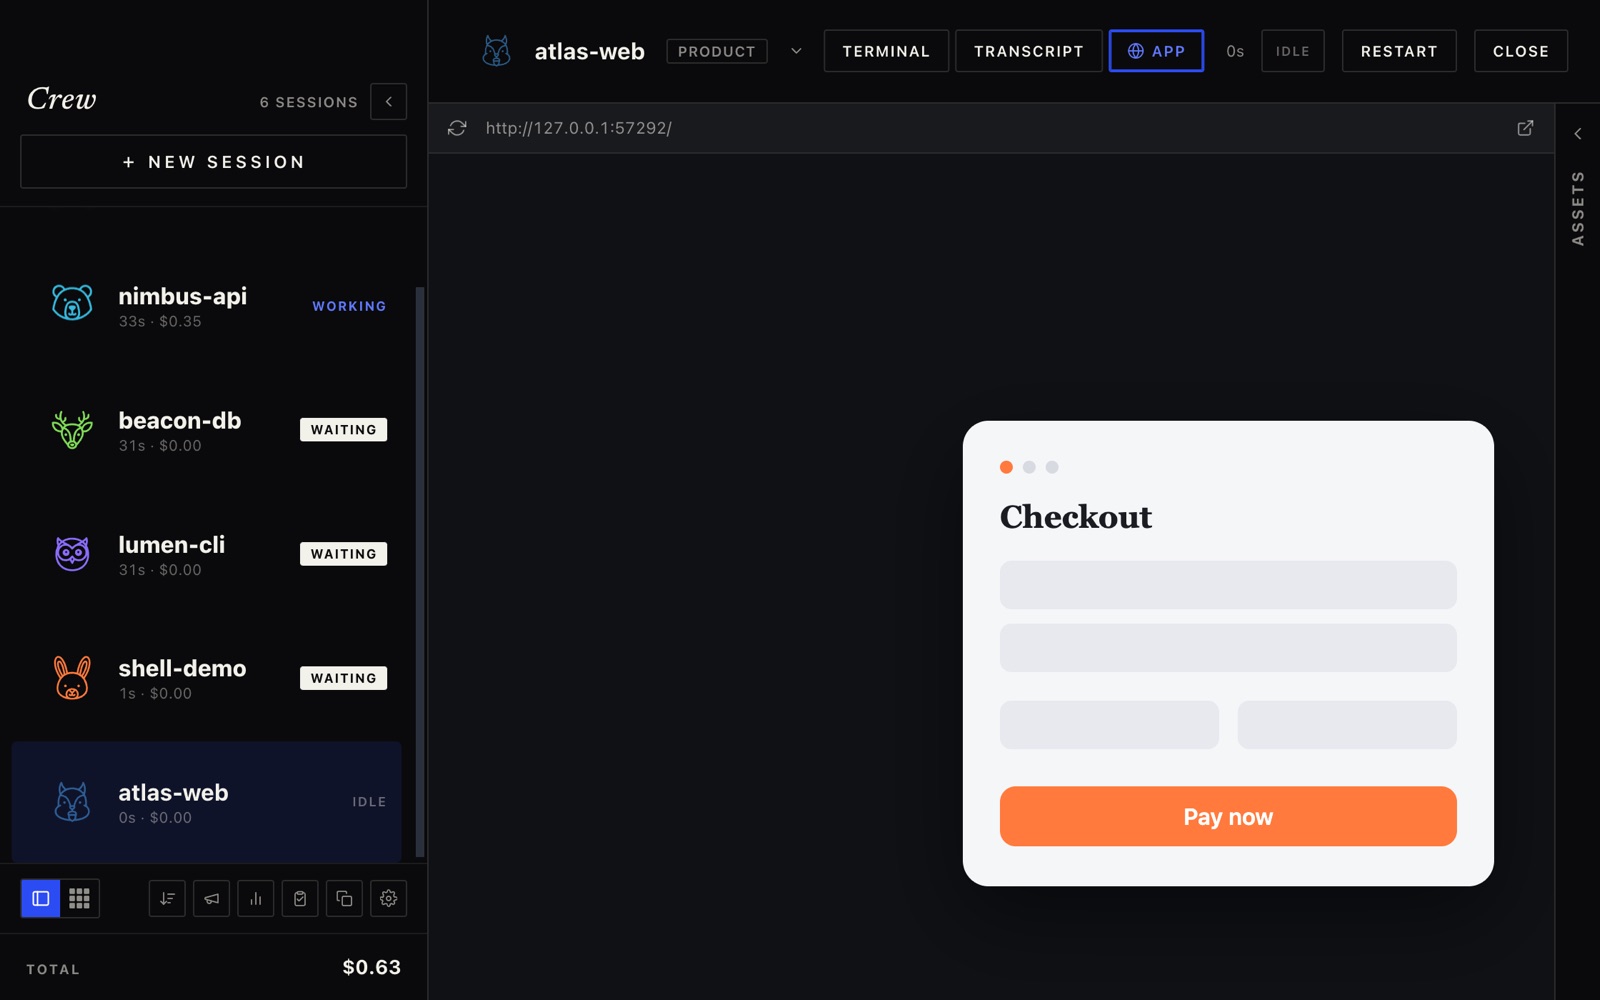
- Auto-detected — the tab appears as soon as a session prints its
http://localhost:…URL; no configuration, nothing to click. - You’re in control — Crew never starts servers for you; it just mirrors the one you ran in the terminal, so there are no surprise processes.
- Reload & open externally — refresh the preview after a change, or pop it out to your default browser.
- Live-reload just works — your dev server’s hot-reload drives the pane exactly as it would a browser tab.
Broadcast.
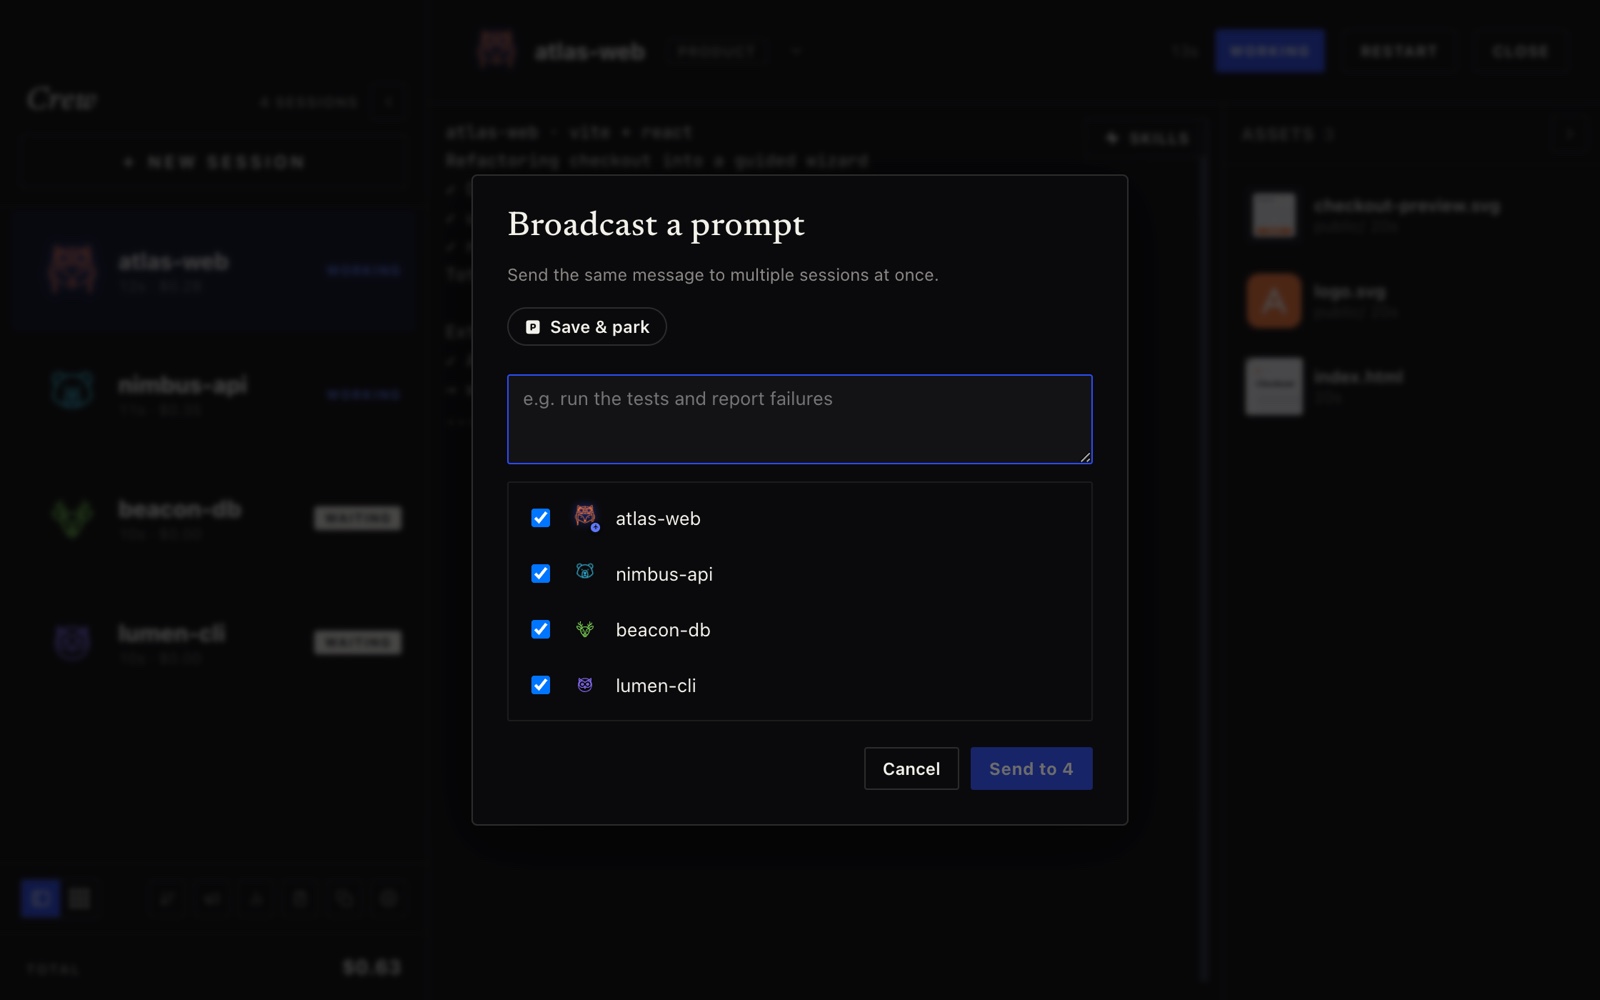
Send the same message to several sessions at once — great for “run the tests” or a coordinated checkpoint.
Activity & spend.
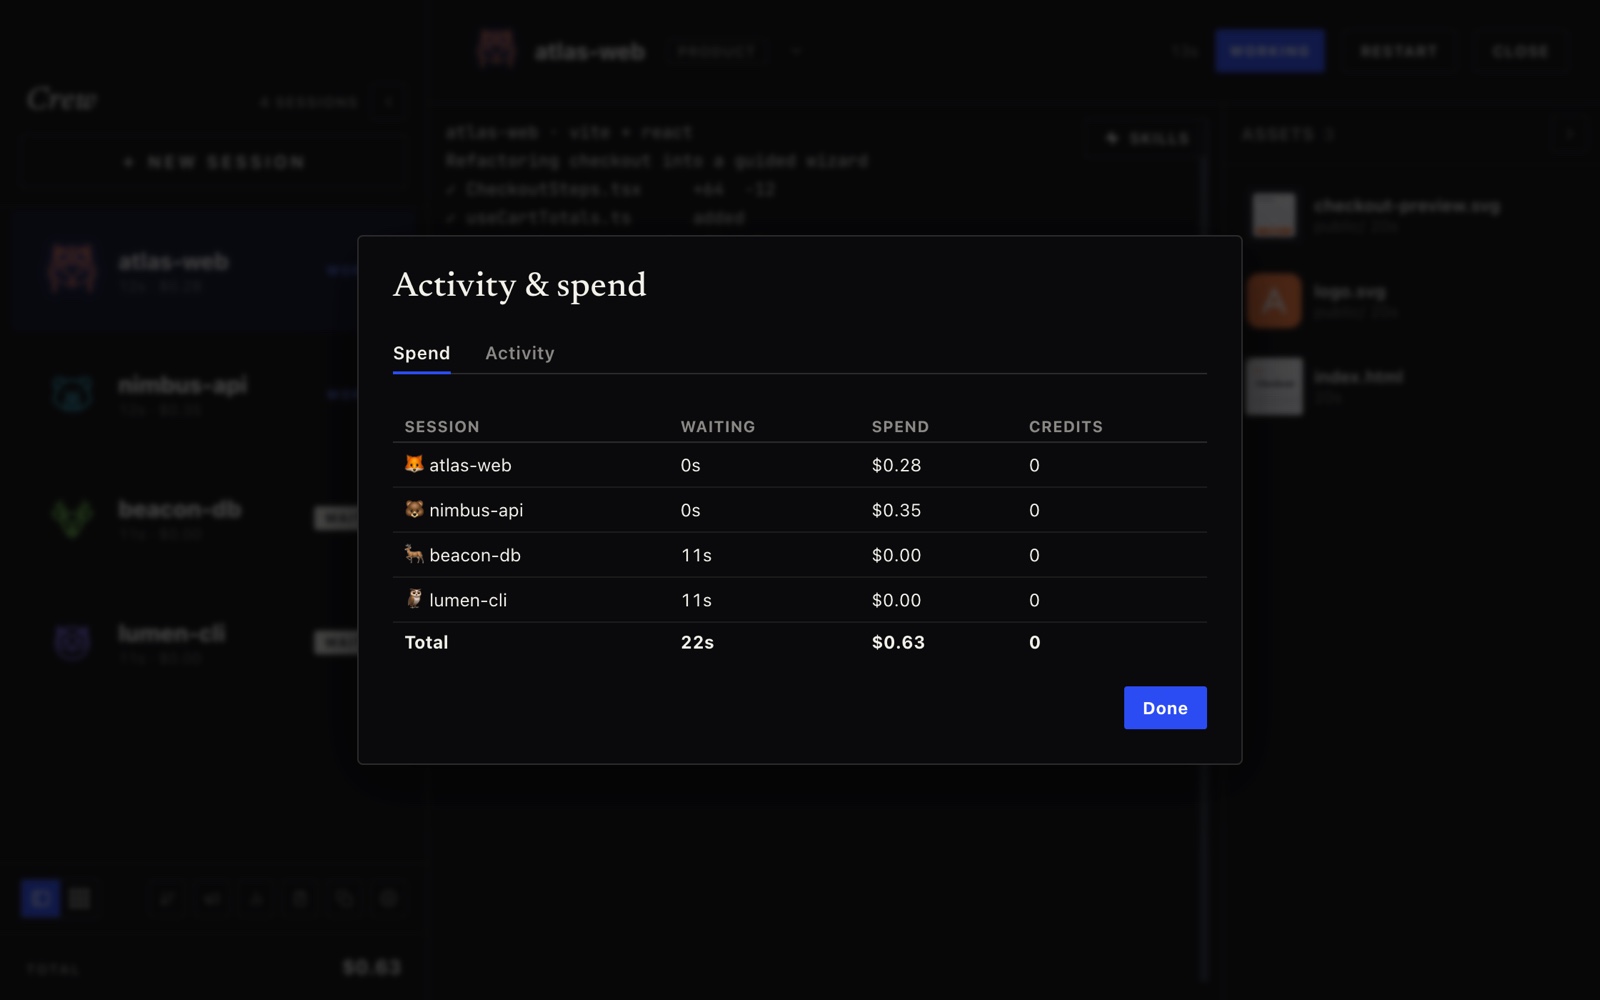
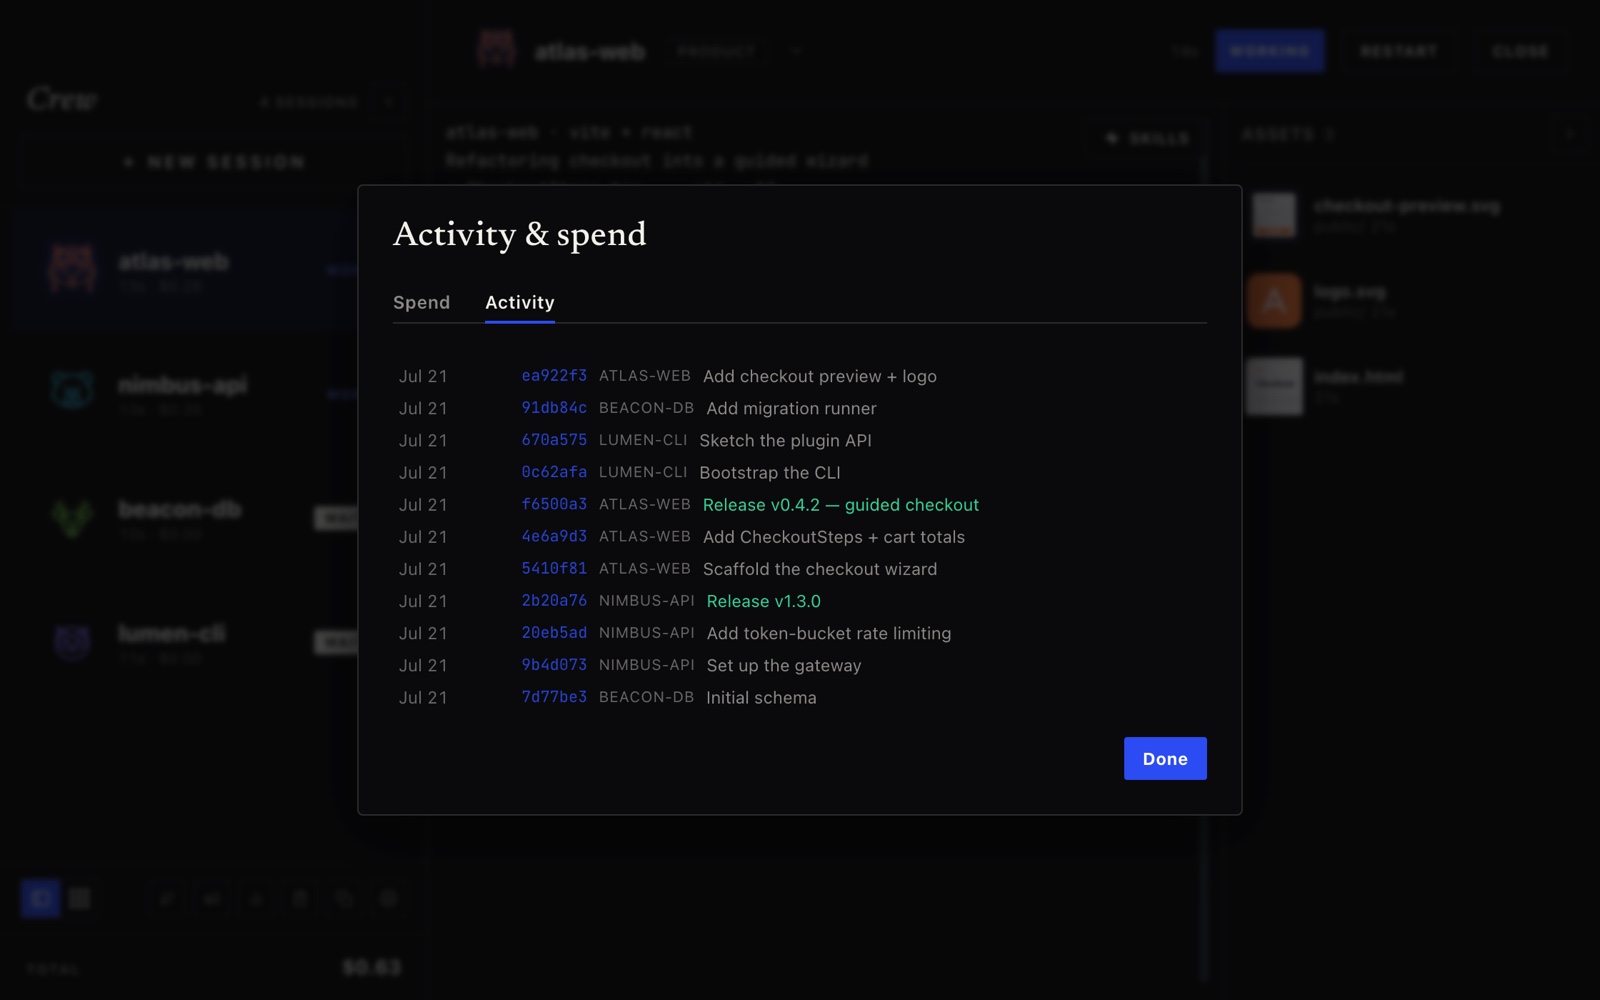
Activity & spend now lives inside the Project Tracker, on its Activity tab (the chart button in the toolbar jumps straight there). Three views: Past Week reviews your Copilot history, Spend totals waiting time + cost + credits per session, and Activity is a live commit feed across your repos.
The Project Tracker.
The clipboard button opens a full-screen Project Index with two tabs. Planning is the live project index — one card per open session, derived straight from disk: git status, version, what shipped recently, open tasks and commit history. Activity is the review layer (Past Week / Spend / commit feed) that absorbed the old Activity & Spend dialog.
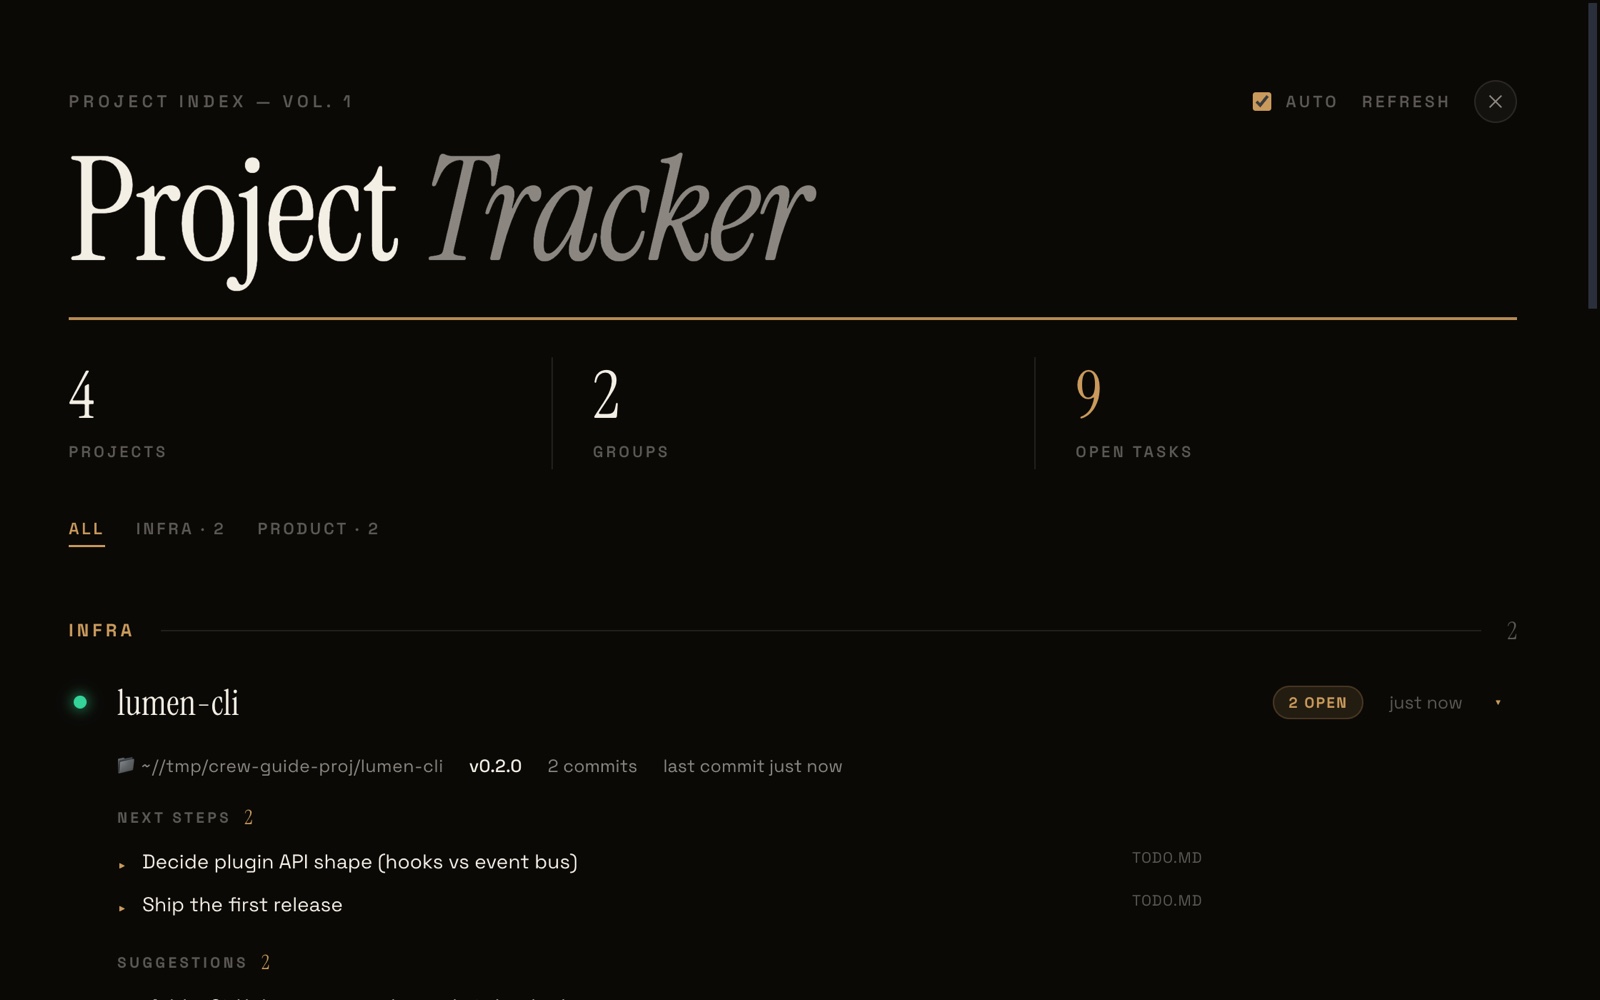
- Activity / Planning tabs — flip between the review dashboard and the live project index.
- Status at a glance — a colored dot (active / recent / stale) and an “N open” task count per project.
- Recently shipped — the week’s commits per project; Open tasks come from the session’s live agent to-do list and each repo’s
TODO.md/ “Next steps”. - Proposed next steps — gentle auto-suggestions (add a README, wire up tests, push a remote…).
- ▶ Launch local — start a project’s dev server right from the tracker (Vite / Next / Node), then stop it again.
- Grouped by your session tags, filterable, with an Auto re-scan every 20s.
The Workspace Manager.
A session can belong to any number of workspaces — named buckets you switch between from File › Change Workspace. The Workspace Manager (File › Workspaces…, or ⌘⇧W) is a full-screen board for organizing them: one lane per workspace, plus an Archived lane for sessions that aren’t in any workspace.
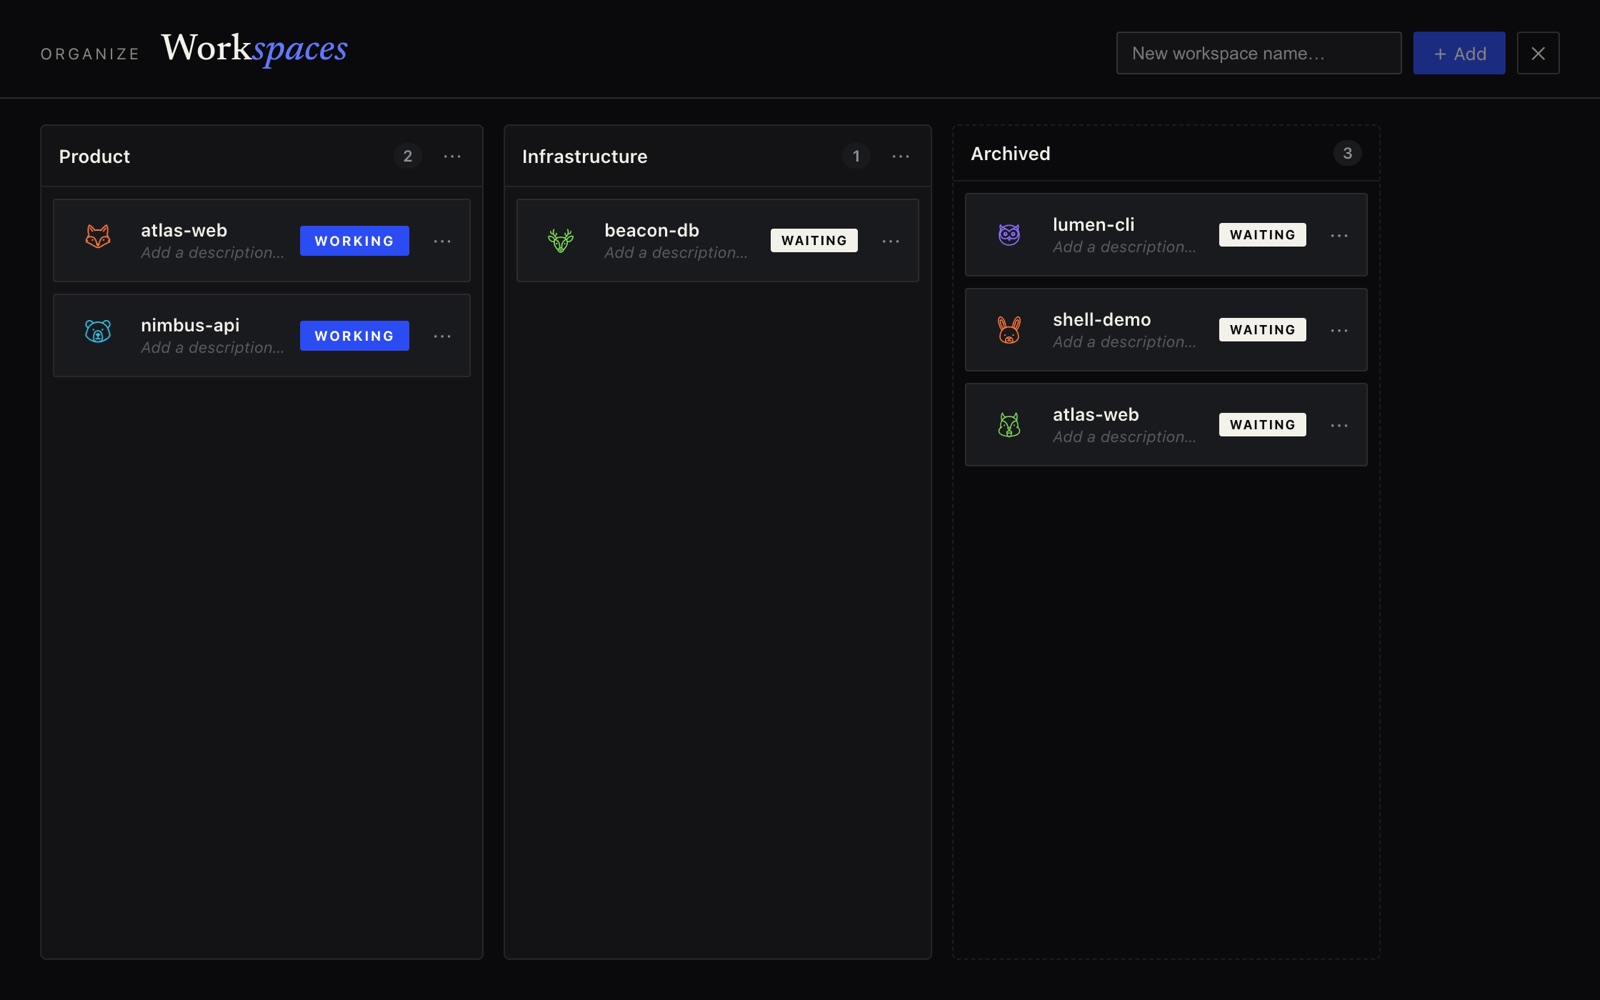
- Drag to organize — drop a session onto a workspace to add it there (it stays wherever it already was). Hold ⌘/⌥ while dragging to move it instead, or drop it on Archived to remove it from every workspace.
- It’s the same live session — organizing never starts or stops an agent. A session in two workspaces is one process shown in both.
- Name & describe — click a card’s title or description to edit it inline, so each session carries a note about what it’s for.
- Manage workspaces — add one from the header, rename or describe a lane, drag lane headers to reorder, or delete a lane (its sessions are archived, never closed).
- Duplicate as new session — spin up a fresh agent from a card’s recipe (same command, folder and character) straight into a workspace.
Search transcripts.
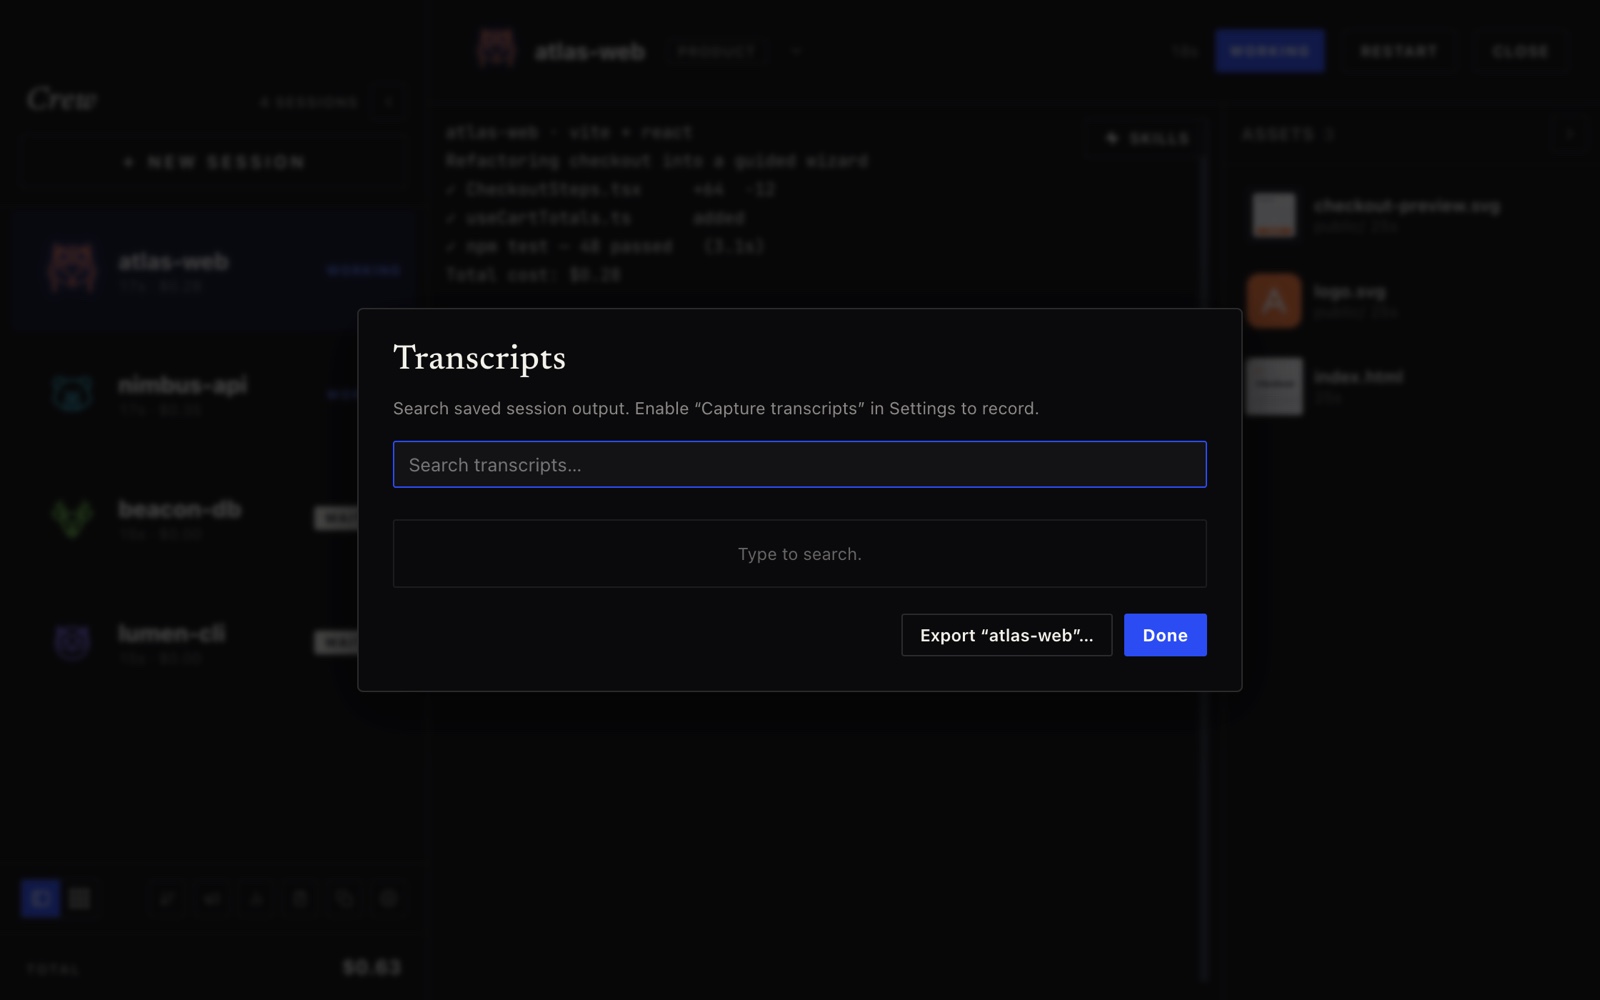
Different from the live Transcript view: turn on Capture transcripts in Settings and Crew saves each session’s output locally so you can search across everything and export a session later. It never leaves your machine.
Command palette & shortcuts.
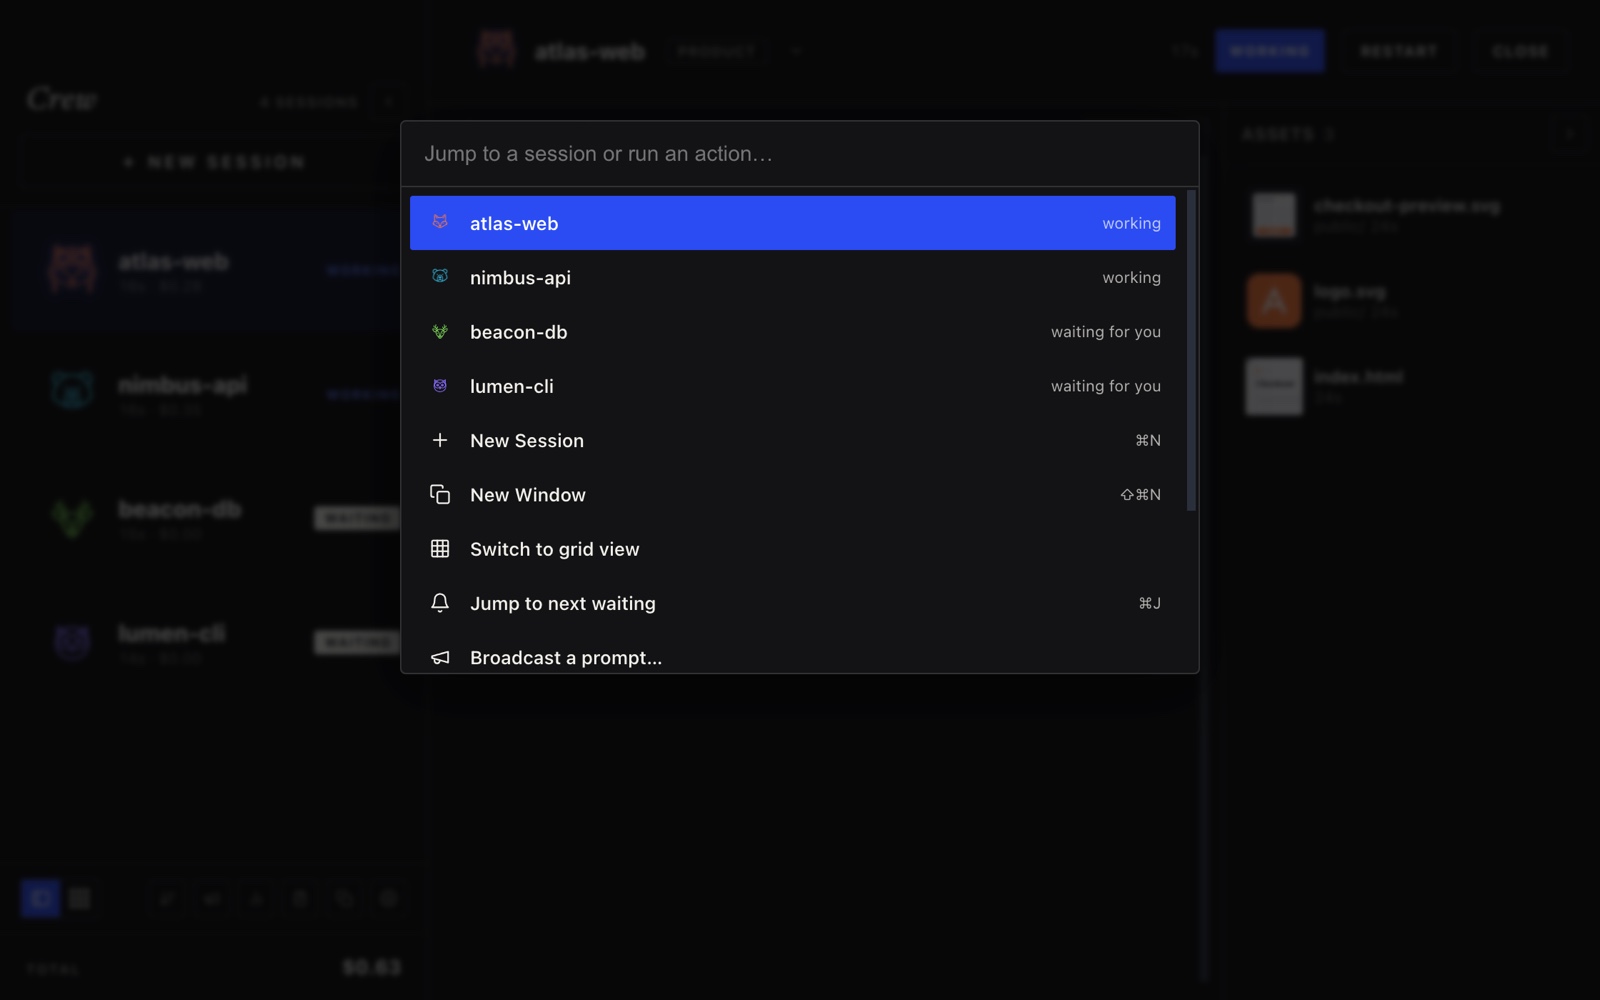
Press ⌘K for a fuzzy quick-switcher: jump to any session, run any action, or switch workspace without touching the mouse.
Settings.
Everything is off-by-default-sensible, but you can tune it all.
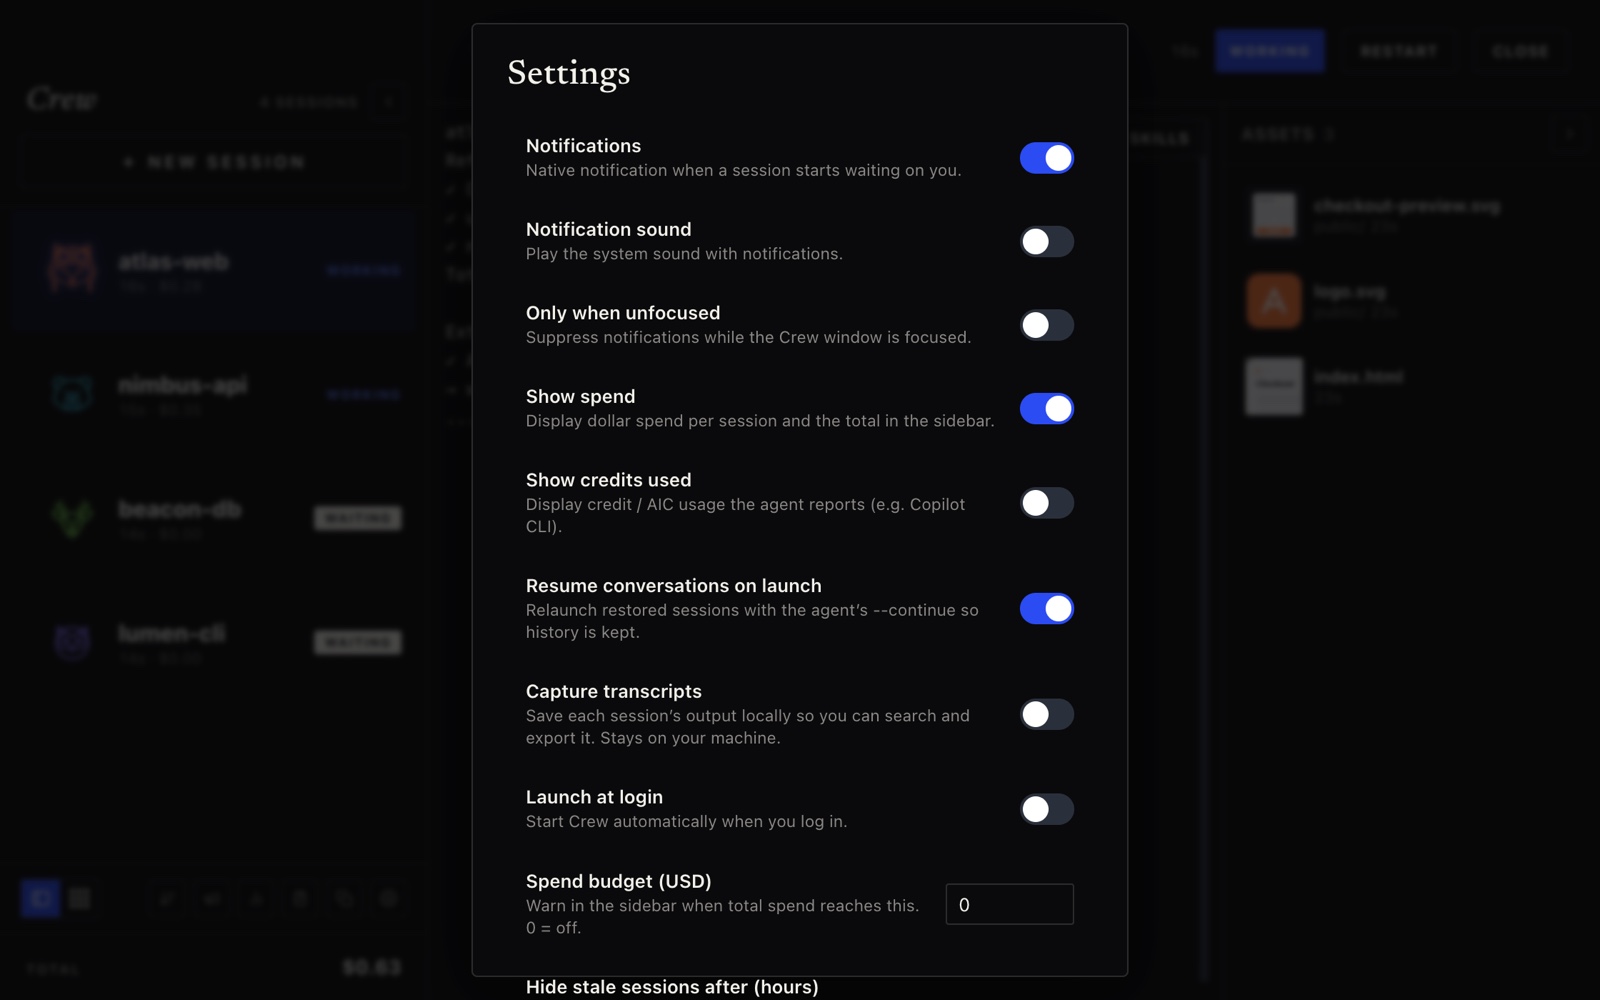
- Notifications — native alert (with optional sound) when a session starts waiting; optionally only when Crew isn’t focused.
- Show spend / credits — per-session and total in the sidebar.
- Resume conversations on launch — relaunch restored sessions with the agent’s
--continue. - Capture transcripts and Launch at login.
- Show minimized in grid as list — collect minimized sessions into one list card at the end of the grid, instead of a “show more” inside each group.
- Cost mode — Auto shows agent-reported dollars; switch to Manual to compute spend from a credits-per-USD rate you set.
- Beta: Enhanced Terminal Interface — opt into Crew’s own terminal engine (command blocks, jump-to-prompt, exit-code ruler).
- Spend budget — warn once total spend crosses a number; Hide stale sessions after N hours in group sort.
Autopilot-aware.
When an agent is running unattended — approving its own edits — its character puts on a pilot costume (goggles + an ✈ badge), and a little takeoff animation plays across the header. You can tell at a glance which agents are flying solo and which are working with you in the loop.
Windows, the menu bar & platforms.
- macOS & Windows — Crew ships as a native app for both (Apple Silicon, Intel, and a Windows installer).
- Multiple windows — ⇧⌘N opens another window onto the same crew, so you can put the grid on one display and a focused session on another.
- Menu-bar / tray badge — a live count of how many sessions are waiting sits in your menu bar (macOS) or system tray (Windows); a native notification fires the moment one needs you.
- 100% local — Crew owns the terminals on your machine. No account, no network, no telemetry.
Specialist agents.
Below the roster sits a shelf of agents — reusable specialists like UX Critique, Code Review and Security Review. Point one at a session and Crew runs it headless, one-shot in that session’s folder and reports back — a bit like a skill, but with its own brain. It runs in the background while you keep working; the agent’s row shows a spinner, then a done badge.
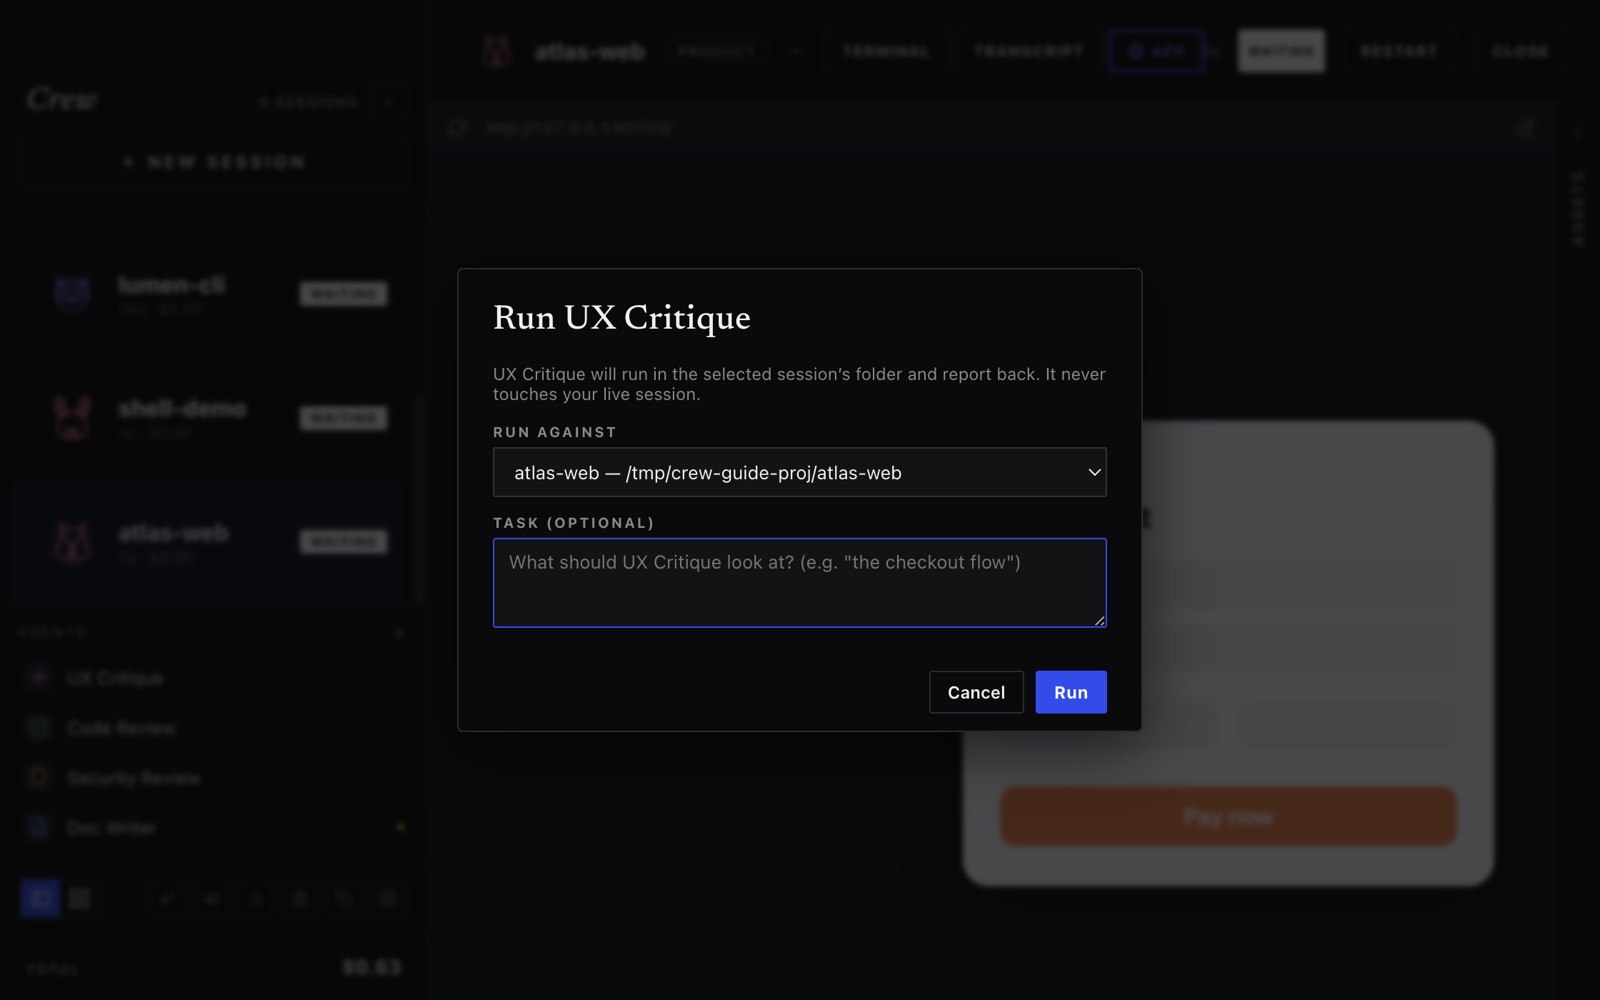
- On call for any session — the shelf is the same everywhere; run a specialist against whichever session you like, with an optional task (“review the checkout flow”).
- Read-first & safe — specialists inspect your code without editing it; an agent that can edit files is clearly flagged. Your live session is never touched.
- Do something with the result — the streaming result panel lets you Copy, Insert into session, or Save to Assets (a markdown note in the folder that shows up in the Assets pane).
- Bring your own — the built-ins are a starting point; add your own specialist with a name, icon, base model and persona, or duplicate one to tweak.
Getting started.
That’s the whole tour. Download Crew, launch a couple of agents, and let the crew do the work — you’ll get pinged the moment one needs you.
↓ Download for macOS ↓ Download for Windows
macOS Intel? Grab the Intel build · Back to the overview →
↑ Back to top